Monero-Wallet erstellen - Windows-Anleitung
In diesem Artikel zeige ich, wie einfach es unter Windows ist, eine eigene Monero-Wallet (XMR) zu erstellen. Die Erstellung einer Monero-Wallet dauert ca. 15 Minuten. Danach werdet ihr im Besitz einer eigenen Monero-Wallet und damit auch einer eigenen Monero Ein- und Auszahlungsadresse sein. Ihr werdet Monero senden und empfangen können.
Voraussetzungen für die sichere Erstellung
einer eigenen Monero-Wallet
-
Die originale Monero-Wallet Installations-Datei
Download: Windows 64-bit (Installer) über Getmonero.org. Nach dem Download noch nicht installieren!. Ladet generell alle Krypto-Wallets immer nur über die Herausgeber-Seite. Nur so erhaltet ihr die höchste Sicherheit. -
Etwas zum schreiben
Bereitet euch etwas zum schreiben vor oder startet euren Passwortmanager (z.B. KeePassXC). Bei der Wallet-Erstellung wird ein privater Schlüssel (Seed) generiert. Diesen Schlüssel müsst ihr später notieren.
Los geht's - XMR/Monero-Wallet
unter Windows installieren
1. Download und Integritätsprüfung (1v8)
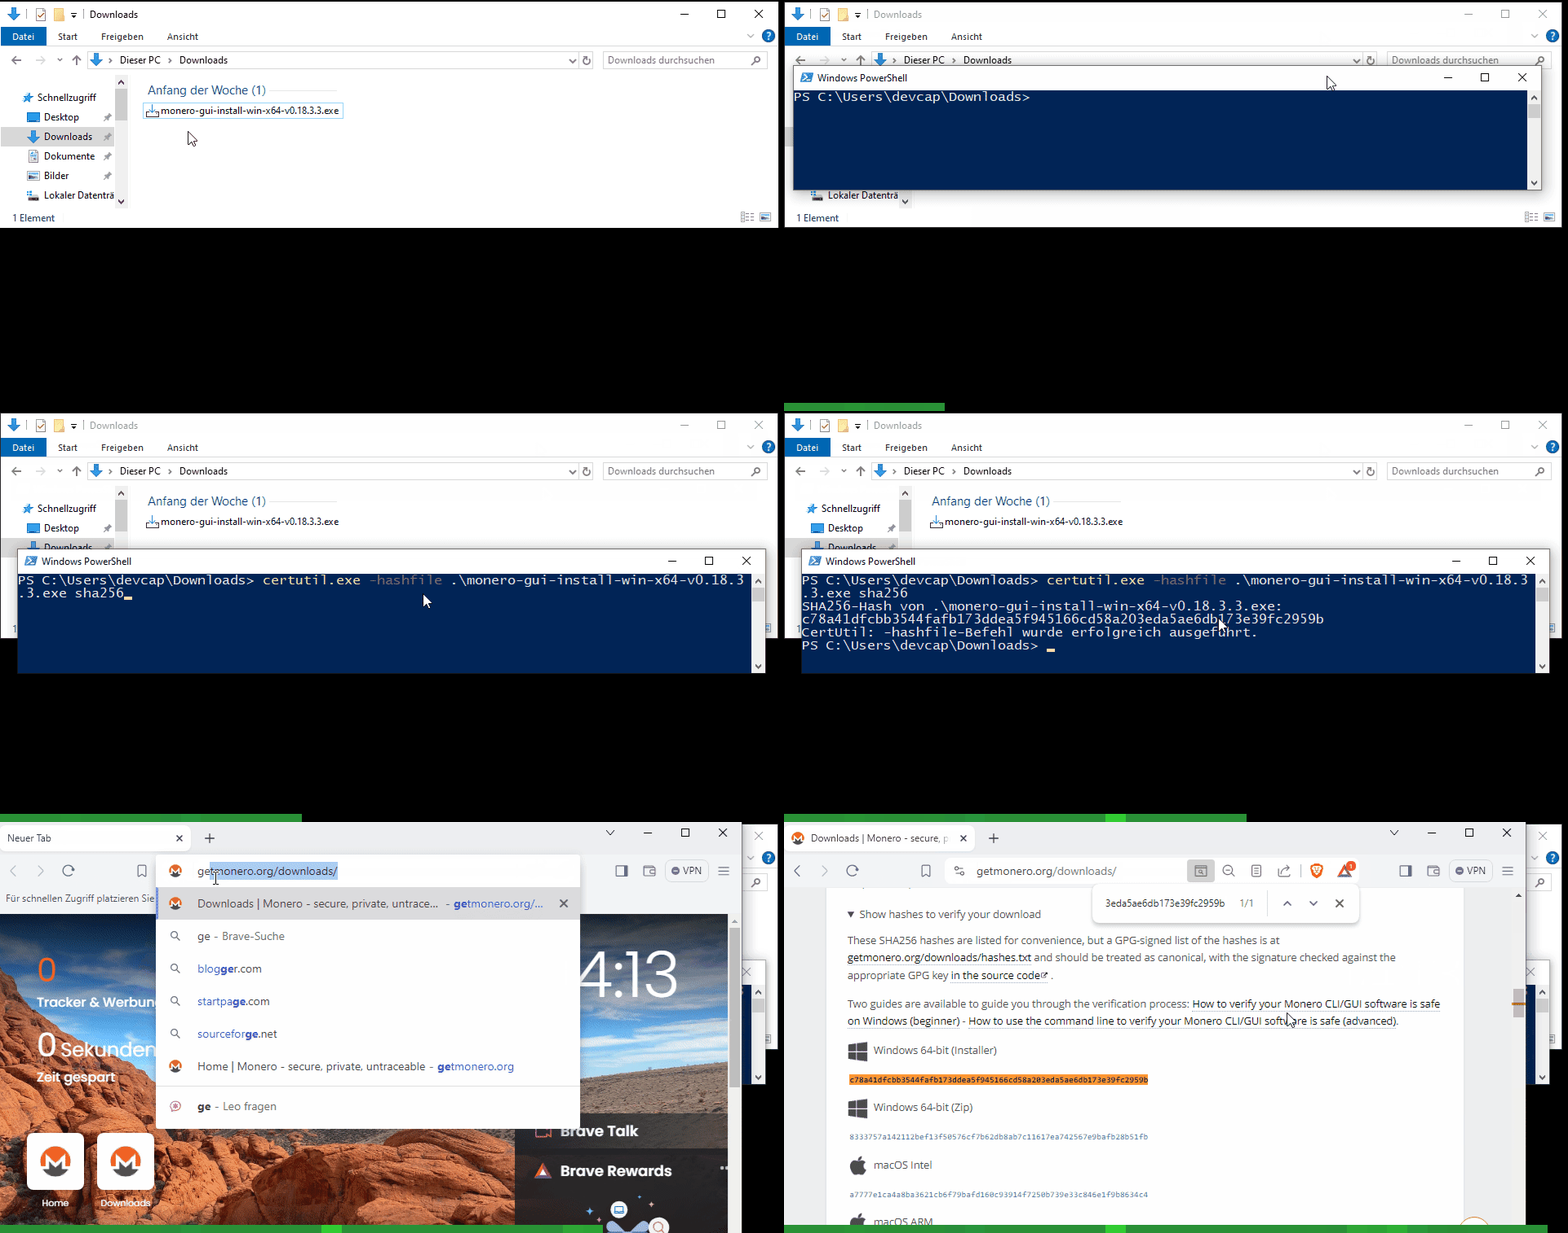
Als erstes müsst ihr prüfen, ob eure heruntergeladene Datei auch wirklich integer ist. D.h. ob diese Datei tatsächlich die original Menero-Wallet vom Herausgeber ist. Das macht ihr mit einer Checksum-Prüfung. Detaillierte Informationen zum Thema Checksum findet ihr hier: Checksum Prüfung
Führt jetzt eine Checksum-Prüfung über die Eingabeaufforderung (cmd/Powershell) für die heruntergeladene Installationsdatei aus. Der Befehl dazu sieht wie folgt aus.
$ Certutil.exe -hashfile .\monero-gui-install-win-x64-v0.18.3.3.exe sha256
Als Ausgabe erhaltet ihr den Hashwert der heruntergeladenen Datei.
$ SHA256-Hash von .\monero-gui-install-win-x64-v0.18.3.3.exe:
$ c78a41dfcbb3544fafb173ddea5f945166cd58a203eda5ae6db173e39fc2959b
$ CertUtil: -hashfile-Befehl wurde erfolgreich ausgeführt.
Dieser Hash muss mit dem Hash auf der Herausgeber-Seite übereinstimmen. Ist das der Fall, so ist eure Datei integer und damit auch sicher.
2. Monero-Wallet Installation (2v8)
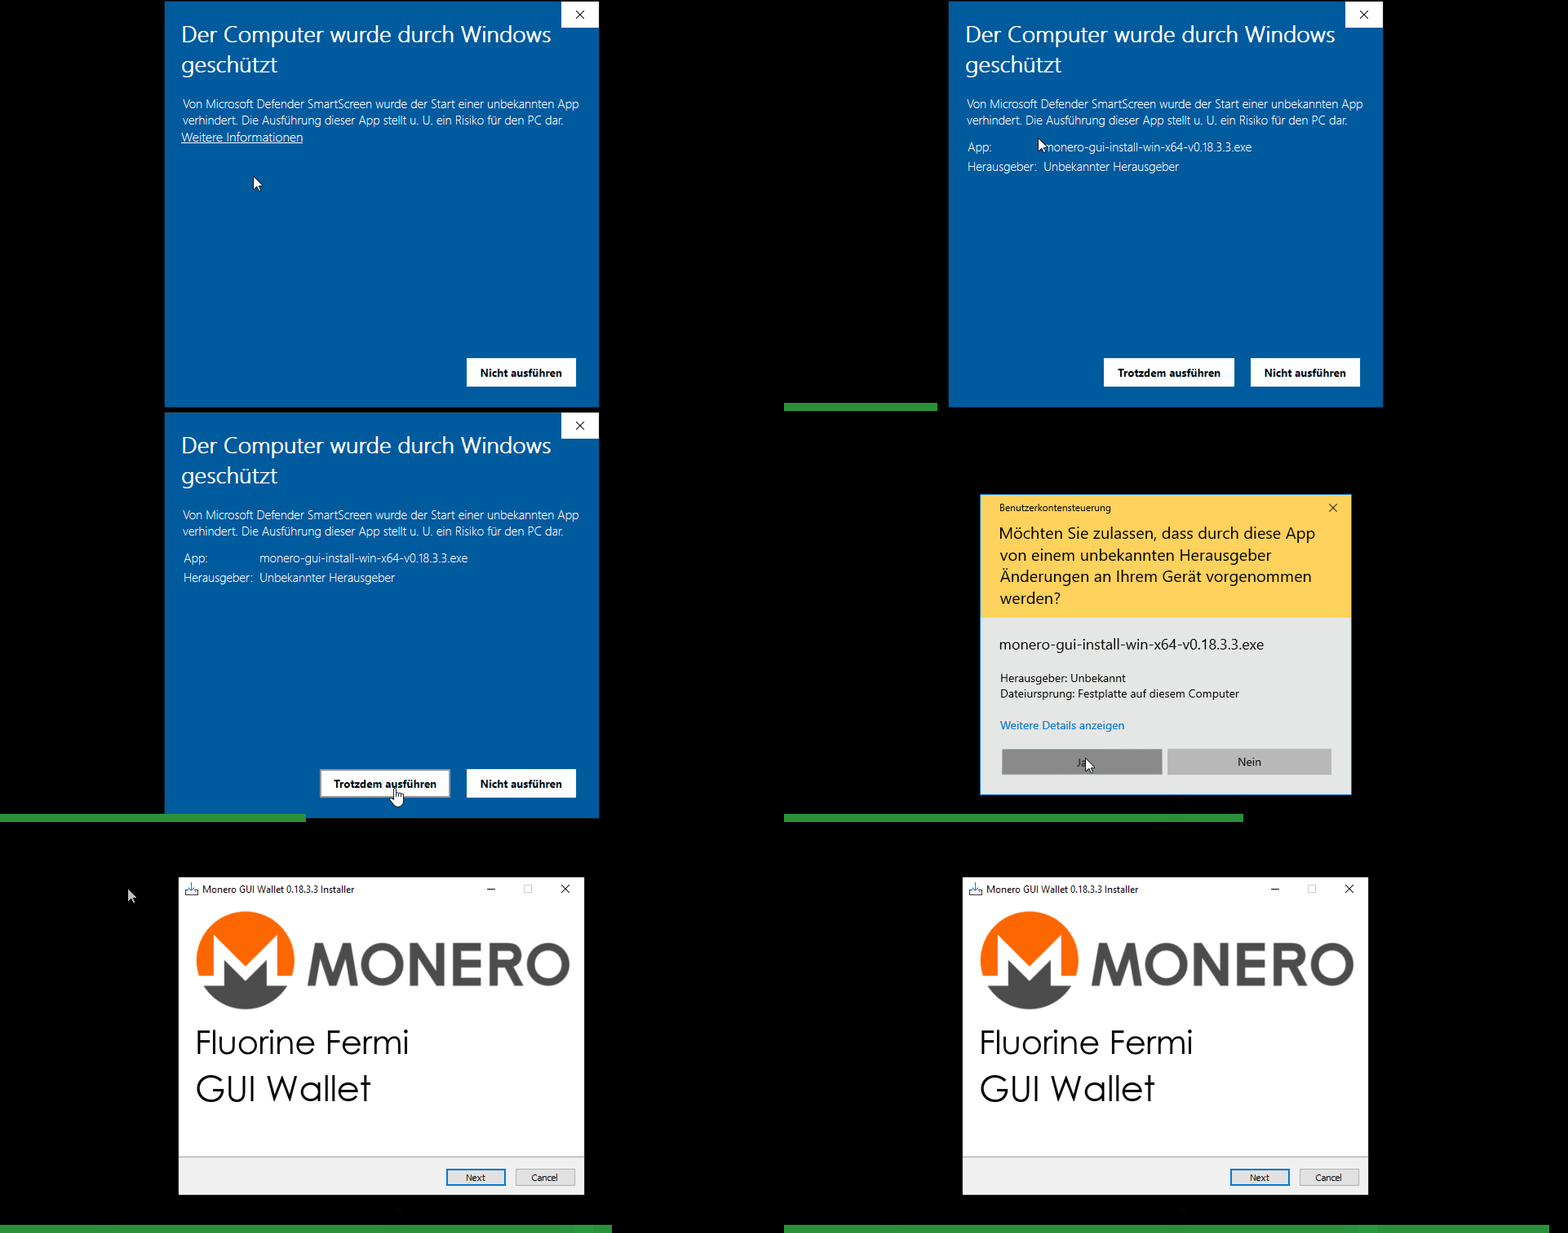
Jetzt kann die Installation der Monero-Wallet per Doppelklick gestartet werden. In diesem Beispiel ist die auszuführende Datei "monero-gui-install-win-x64-v0.18.3.3.exe".
Unter Windows erscheinen jetzt folgende Warnungen. 1. "Der Computer wurde durch Windows geschützt" und 2. "Möchten Sie zulassen, dass durch diese App von einem unbekannten Herausgeber Änderungen an Ihrem Gerät vorgenommen werden?".
Diese Meldungen bedeuten, dass Windows diese Datei nicht kennt und somit auch nicht signiert hat. Das ist auch verständlich, da Monero kein zentrales Unternehmen ist. Um fortzufahren auf "Weitere Informationen" und dann auf "Trotzdem ausführen" klicken. Danach könnt ihr die Installation durchführen.
3. Monero-Wallet Viruswarnung / Quarantäne (3v8)
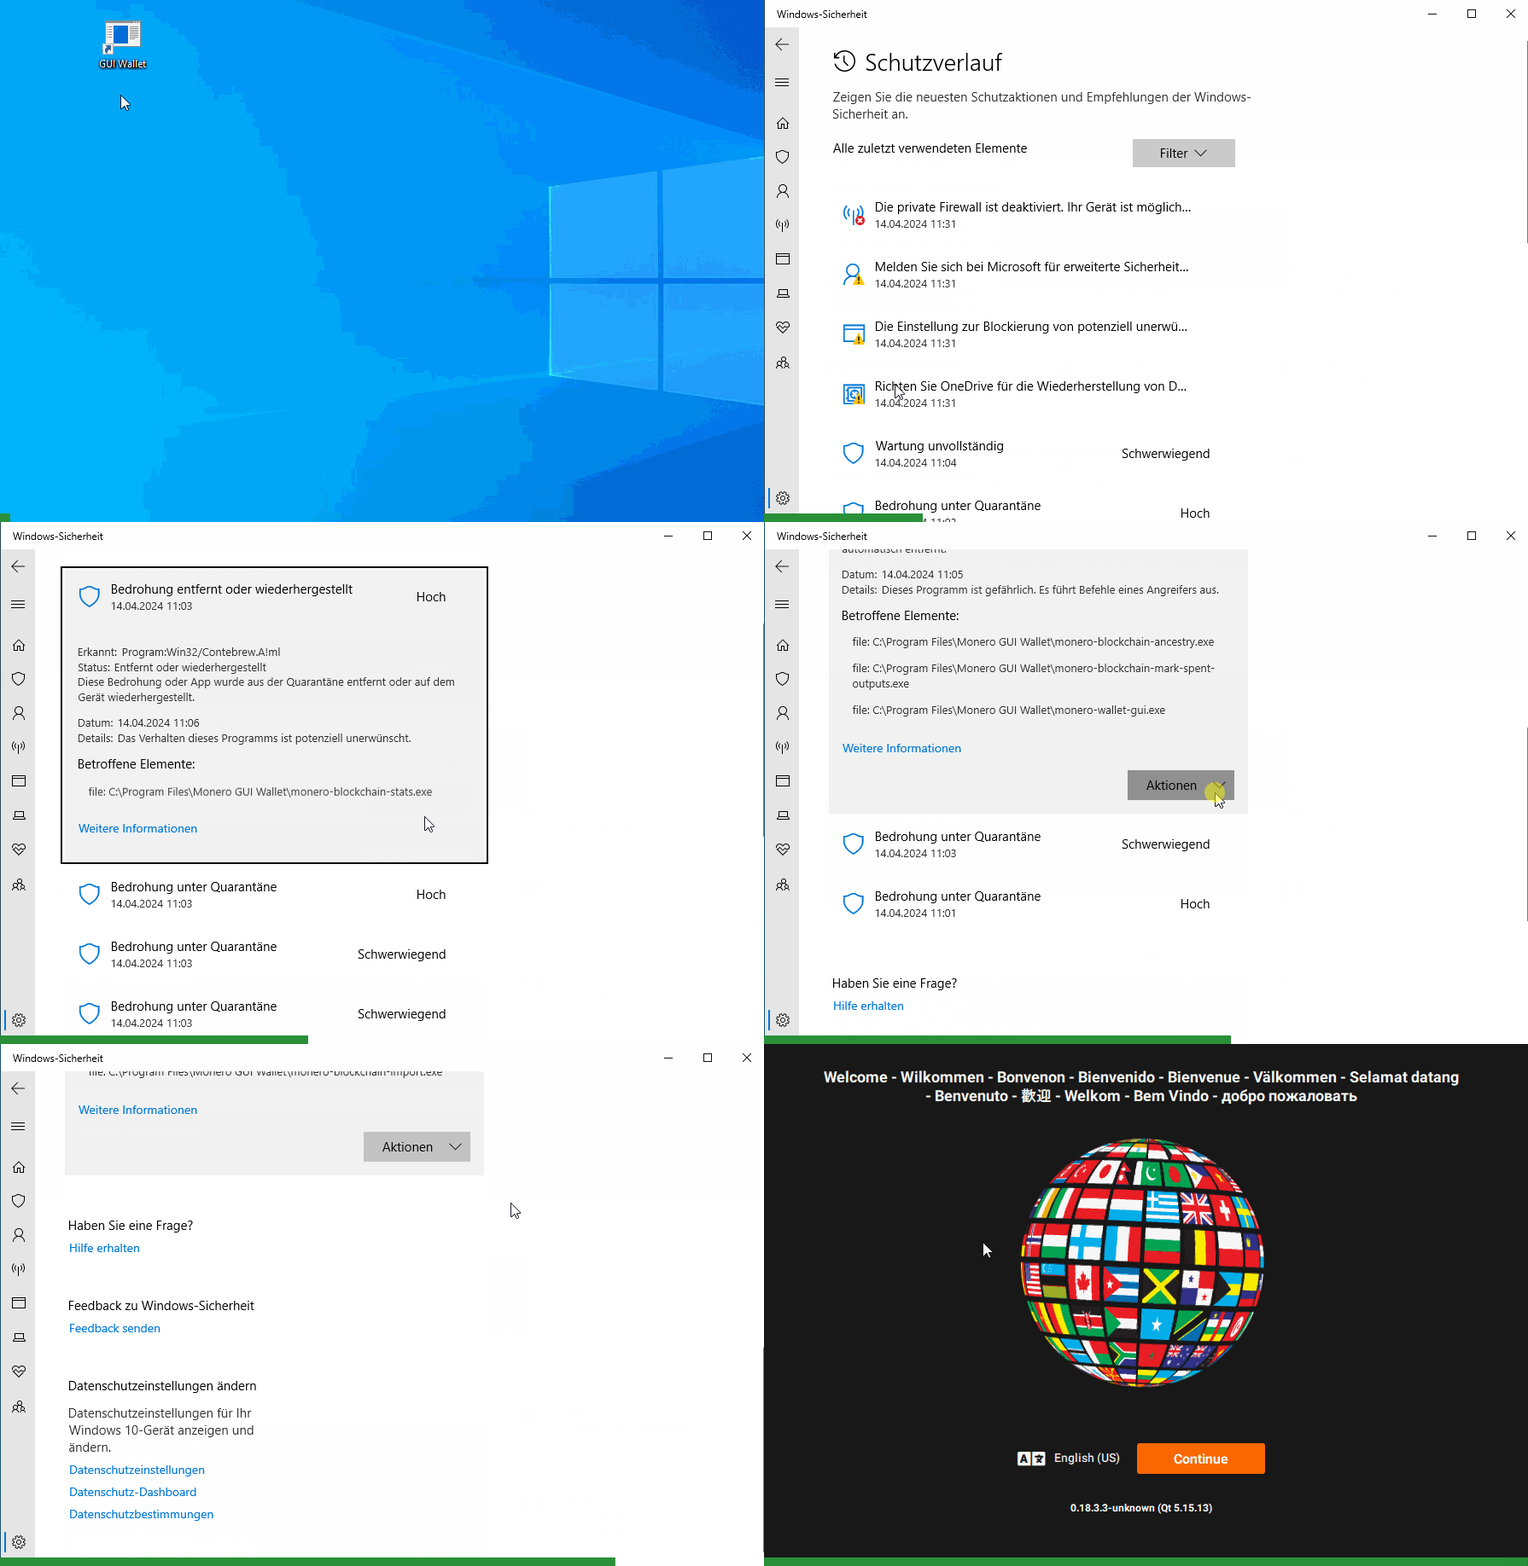
Stand April 2024 verschiebt Windows Viren- & Bedrohungsschutz wichtige Monero-Dateien wg. "(Trojan:Win32/Acatac oder Trojan:Win32/Contebrew.A!ml)" in die Quarantäne. Damit wird die Monero-Wallet nicht gestartet werden können. Das bedeutet nicht, dass Monero ein Trojaner oder Virus ist. Wenn die Checksum-Prüfung positiv war, dann sind die Dateien okay. In diesem Fall müssen alle einzelnen Monero-Wallet-Dateien wie folgt wiederhergestellt werden.
Die Animation ist stark verkleinert und verkürtzt, da diese sonst zu groß geworden wäre.
4. Monero-Wallet Sprache wählen (4v8)
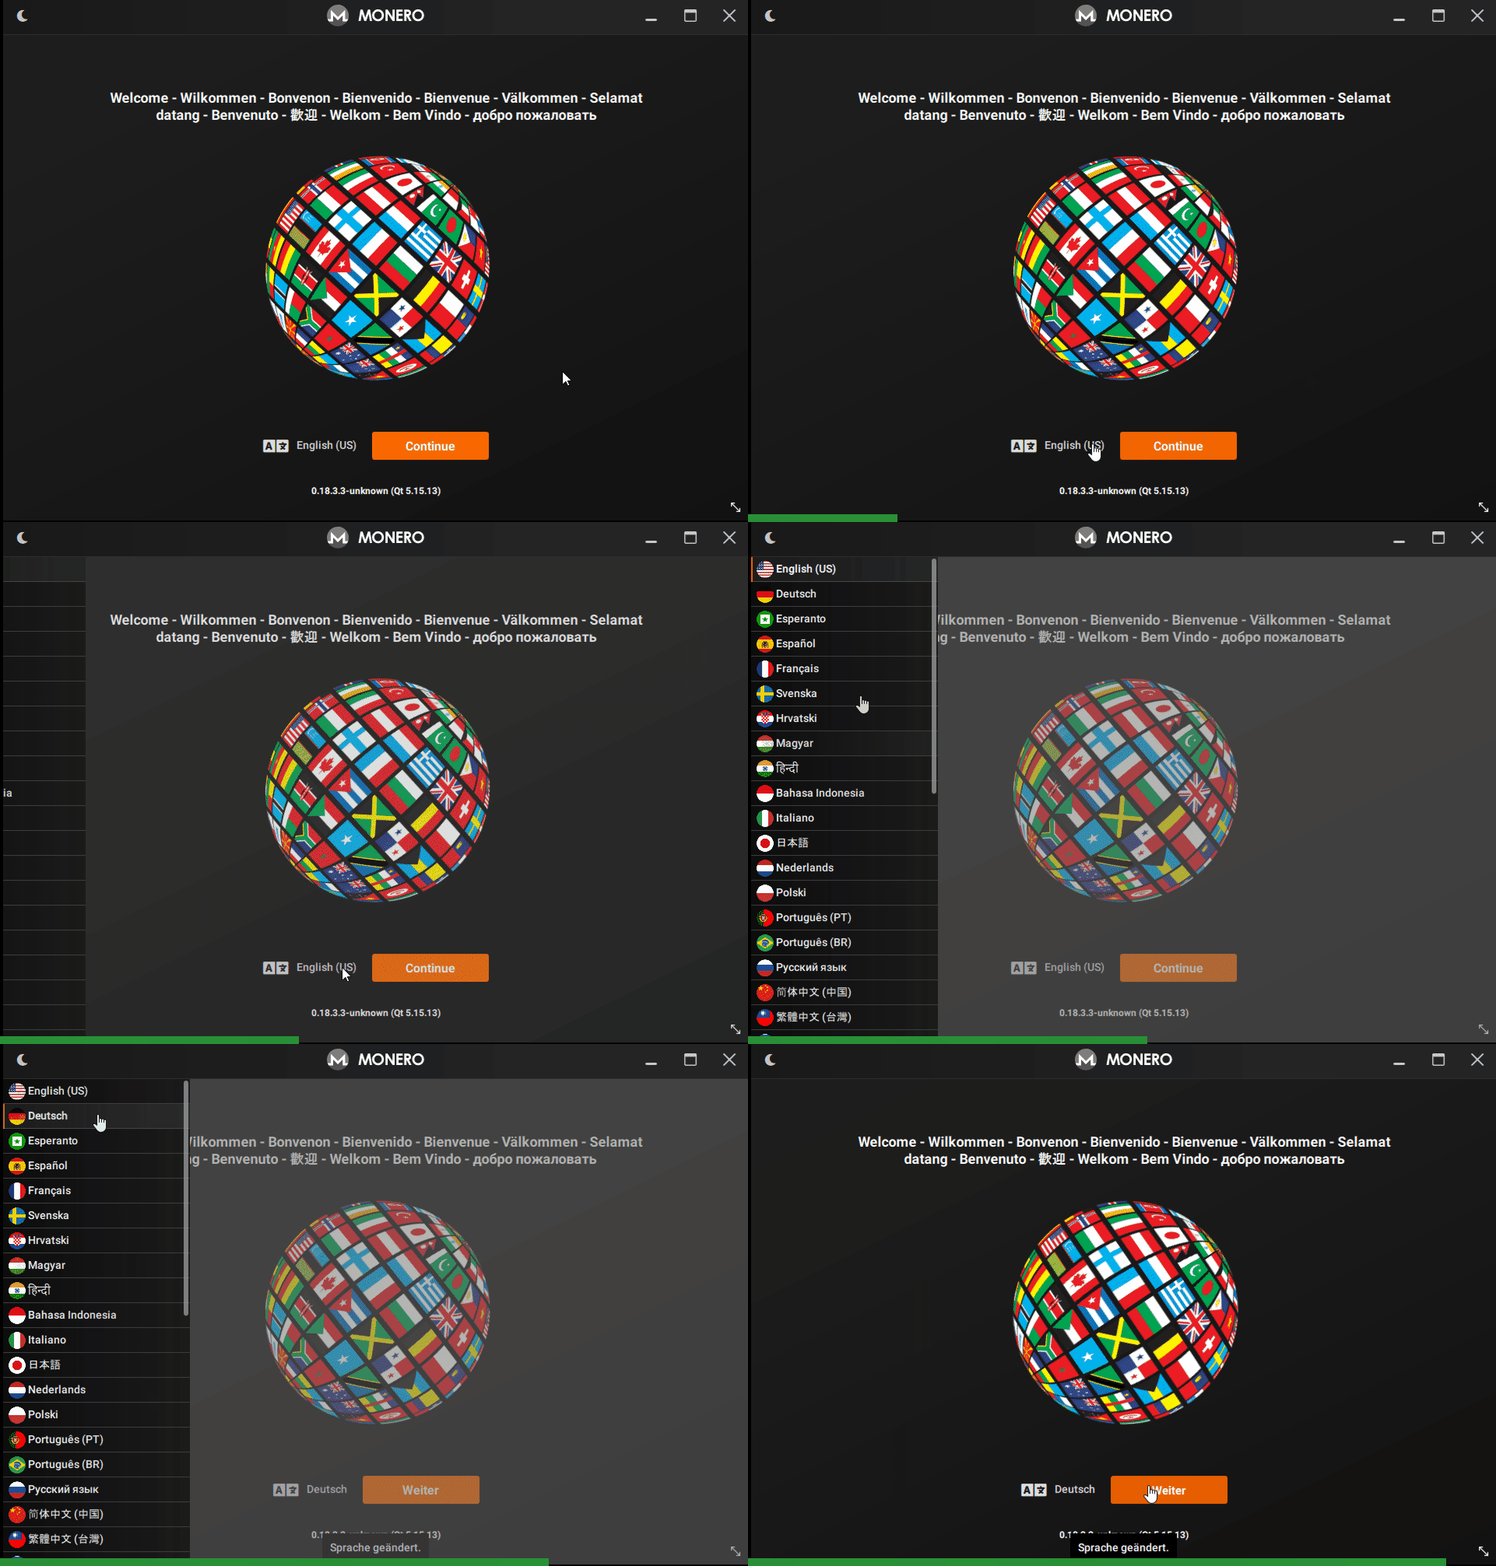
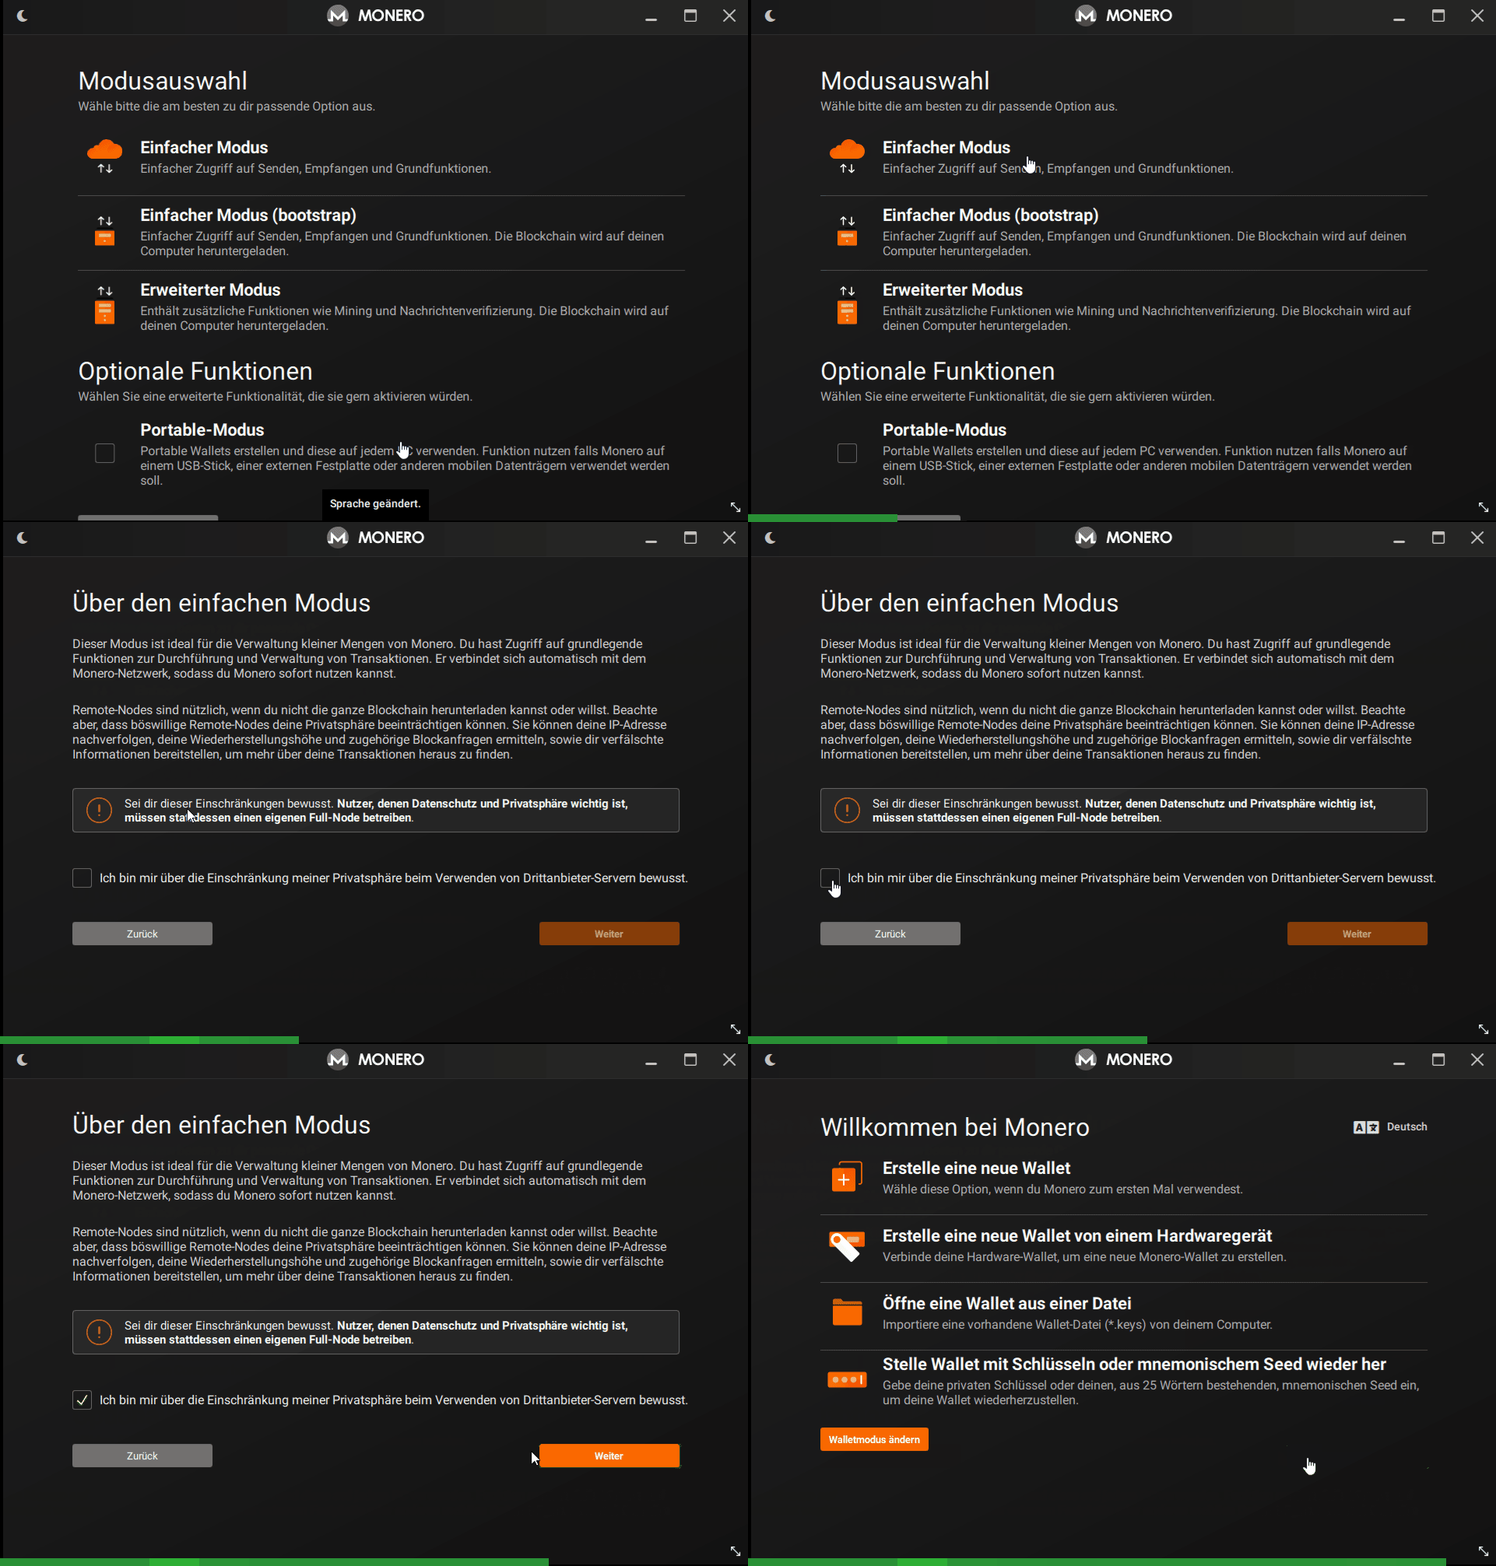
Nachdem ihr nun die Wallet installiert habt, könnt ihr die Wallet öffnen. Als erstes erscheint die Auswahl der Sprache. Ändert diese auf "Deutsch" und klickt auf "Weiter".
5. Monero-Wallet Modus wählen (5v8)
In dieser Maske wählt ihr "Einfacher Modus" aus. Setzt dann ein Häkchen bei "Ich bin mir über die Entschränkung meiner Privatsphäre beim Verwenden von Drittanbieter-Servern bewusst." und drückt auf "Weiter".
6. Monero-Wallet erstellen (6v8)
Geht nun auf "Erstelle eine neue Wallet". Danach könnt ihr der neuen Wallet einen Namen vergeben. Der Wallet-Name ist nur zur Orientierung innerhalb dieser Installation gültig. Der Name wird nicht auf der Monero-Blockchain gespeichert.

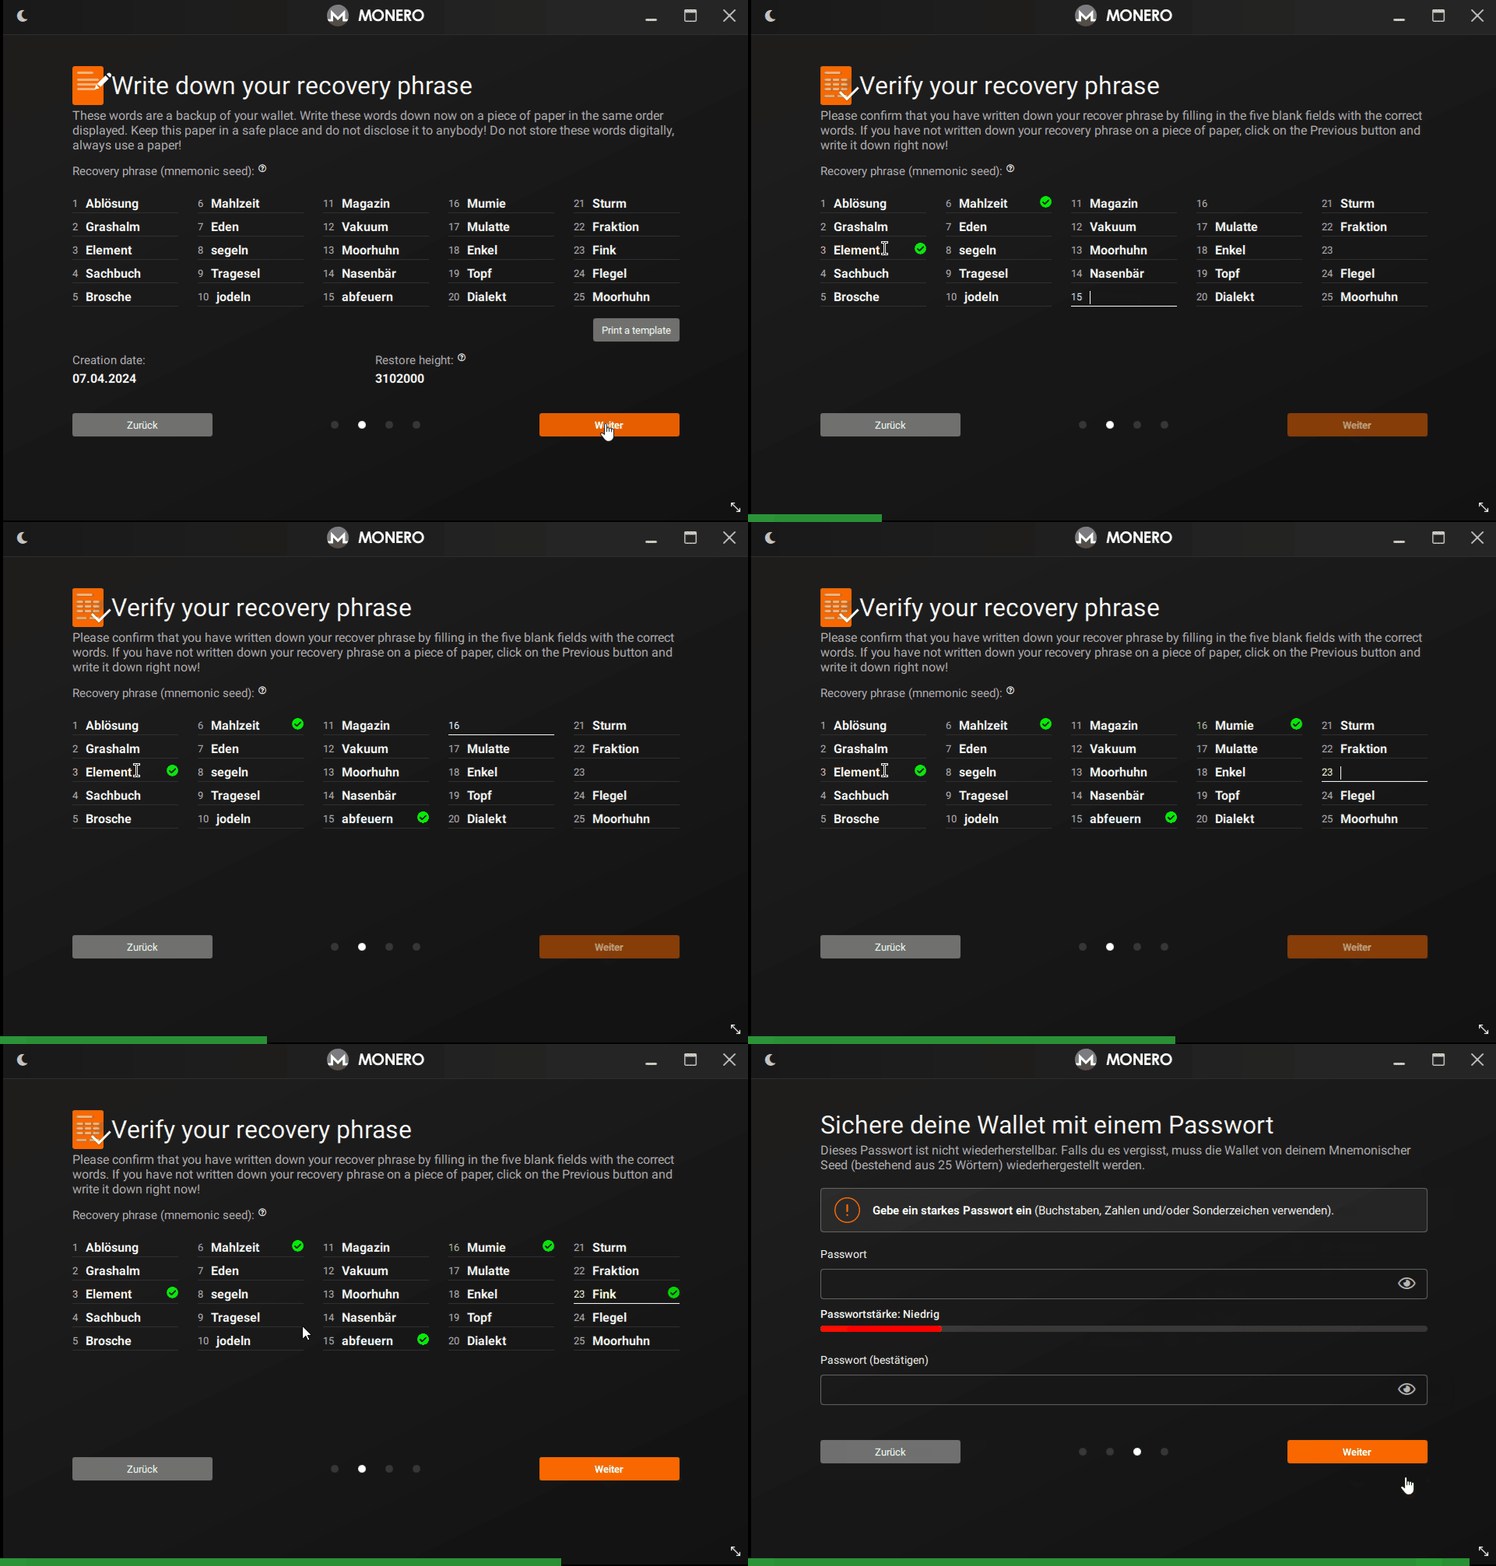
7. Monero-Wallet Seed, der Schlüssel! (7v8)
Jetzt folgt der wichtigste Teil der Monero-Wallet-Erstellung, der Seed!
Wichtig! Wichtig! Wichtig! Notiert euch diesen seed (Mnemonischer Seed), d.h. die 25 Wörter und legt diesen Seed an einem sehr sicheren Ort ab. Der Seed ist der einzige Schlüssel, um die eigene Wallet wieder herstellen zu können.
Verliert ihr diesen Seed, so verliert ihr den Zugang zu euren Coins für immer! Jeder der diesen Seed hat, hat vollen Zugriff auf die Coins! Achtet darauf, dass niemand anderes diesen Seed besitzt!
D.h. jetzt müsst ihr den Seed notieren. Nach Erledigung, klickt auf "weiter". Anschließend müsst ihr den Seed vervollständigen. Mit der Vervollständigung prüft das Programm, ob ihr den Seed wirklich notiert habt.
Notiert euch auch die "Creation date" und die "Restore height". Damit wird die Wiederherstellung der Wallet beschleunigt.
Drückt anschließend auf "Weiter".
8. Monero-Wallet Abschluss & Anmeldung (8v8)
Jetzt müsst ihr der Wallet noch ein sicheres Passwort vergeben und abschließend die Dateils prüfen. Das Passwort solltet ihr natürlich auch notieren. Das Passwort wird für die Anmeldung diese Wallet-Intallation benötigt. Für eine Wallet-Wiederherstellung ist kein Passwort notwendig. Wenn alles okay ist, dann drückt jetzt auf "create wallet".
Ihr springt automatisch in die Wallet-Anmeldung. Gebt anschließend das Passwort ein und schon seit ihr in euerer Monero-Wallet.
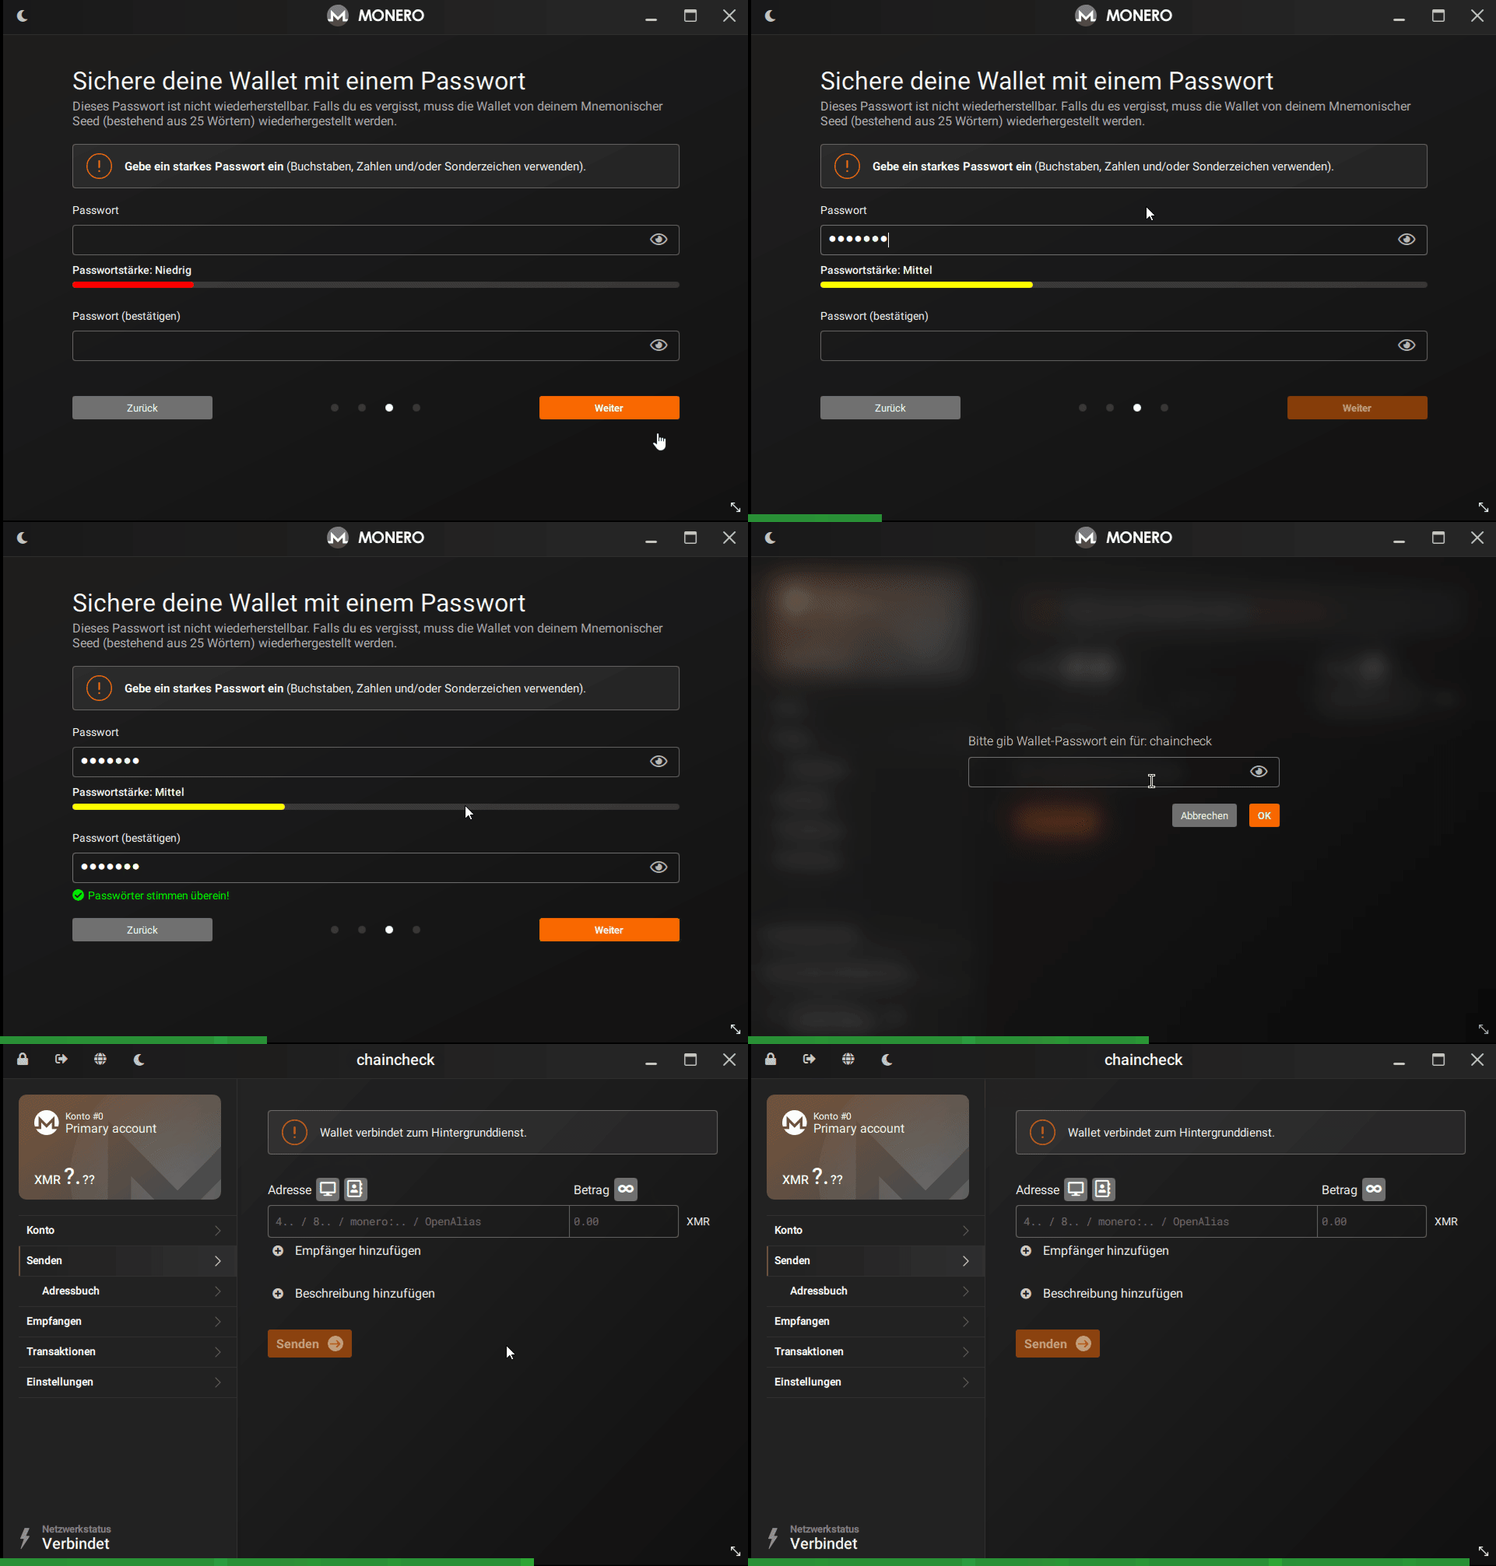
Geschafft! Ihr seid jetzt im Besitz einer eigenen Monero-Wallet.
9. Zusatz: Eure Monero Einzahlungsadresse
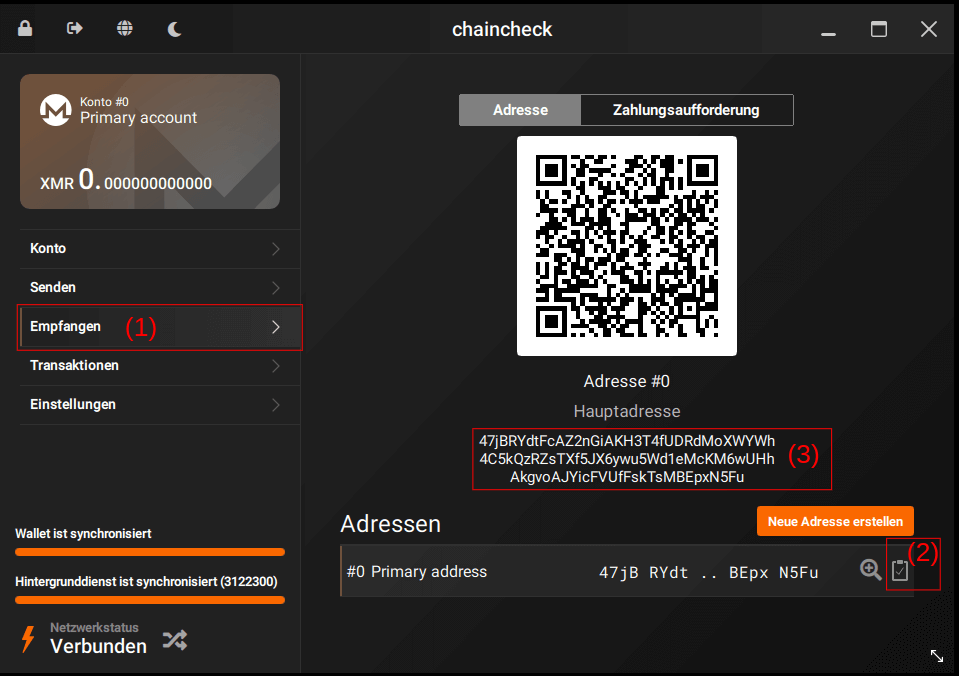
Unter dem Punkt "Empfangen" (1) findet ihr eure eigene Monero-Adresse (Einzahlungsadresse). Diese ist vergleichbar mit einer IBAN. D.h. diese Adresse könnt ihr jedem nennen, der euch Monero überweisen möchte. Zum kopieren einfach auf das Zeichen "Zwischenablage" (2) oder auf die Adresse (3) klicken.
10. Bonus: Ein Vorteil von Monero ggü. Bitcoin
Monero bietet einen unschätzbaren Vorteil: die Unmöglichkeit, über eine Adresse die Anzahl der Coins zu ermitteln. Diese einzigartige Eigenschaft gewährleistet vollständige Privatsphäre für Transaktionen und schützt die finanzielle Integrität der Nutzer auf höchstem Niveau.