Monero Mining - Windows Anleitung
In diesem Artikel zeige ich, wie schnell und einfach ihr Monero Mining unter Windows einrichten und betreiben könnt. Für Monero-Mining wird keine zusätzliche Hardware/Grafikkarte benötigt. Monero nutzt den RandomX-Algorithmus (CPU-Mining) und funktioniert damit selbst auf einem Laptop. Die Gesamteinrichtung dauert etwa 25 Minuten. Danach werdet ihr selbst Monero-Coins 24/7 schürfen können.
Monero CPU-Mining - RandomX Algorithmus
Der Monero Mining-Algorithmus RandomX (CPU-Mining) begünstigt keine ASICs und Grafikkarten, wie das im Bitcoin Mining-Algorithmus (SHA256) der Fall ist. Damit ist der Monero Miningeinstieg viel geringer als beim Bitcoin, da hierfür keine teure Hardware wie ASICS oder Grafikkarten angeschafft werden müssen.
Monero Mining ist mit normalen Prozessoren wie z.B. einem Intel i5-i9 oder einem AMD Ryzen 5-9 möglich. Damit sind auch ordentliche Hashraten von 10-20kHz möglich.
Durch diesen fairen Zugang zum Monero-Mining sollte die Coin- und Mining-Verteilung viel stärker und damit auch dezentraler sein, als z.B. beim Bitcoin. Da Monero jedoch per Design privacy ist, ist eine Prüfung der Coin-Verteilung nicht möglich.
Voraussetzungen für Monero-Mining (Windows)
- Monero-Wallet (Adresse)
Für das Mining benötigt ihr eine eigene Monero-Wallet, damit ihr eure geschürften Coins auf diese Adresse erhaltet. Noch keine Monero Wallet? Monero XMR Wallet erstellen : Windows Anleitung - Mining-Software (xmrig)
Ladet euch über GitHub die aktuellste Monero Mining-Software xmrig gcc herunter. WICHTIG: Nach dem Download noch NICHT entpacken! Downloadlink: xmrig/GitHub Releases - Mining-Pool (SupportXMR)
Solo Mining macht bei großen Coins wie Monero keinen Sinn. Es würde Jahre dauern, bis man alleine einen Block bestätigt/geminted hat. Die Lösung ist Pool-Mining. Dabei bündeln alle Miner ihre Hashrate. Dadurch werden Blöcke häufiger bestätigt/geminted. Der Ertrag wird dann auf alle Teilnehmer nach der zur Verfügung gestellter Hashrate verteilt. Für diese Anleitung wird der SupportXMR-Pool verwendet. Andere Pools findet ihr hier: Minigpoolstats.stream
Los geht's - XMR/Monero (CPU) Mining
1. Mining-Software xmrig herunterladen und auf Integrität prüfen!
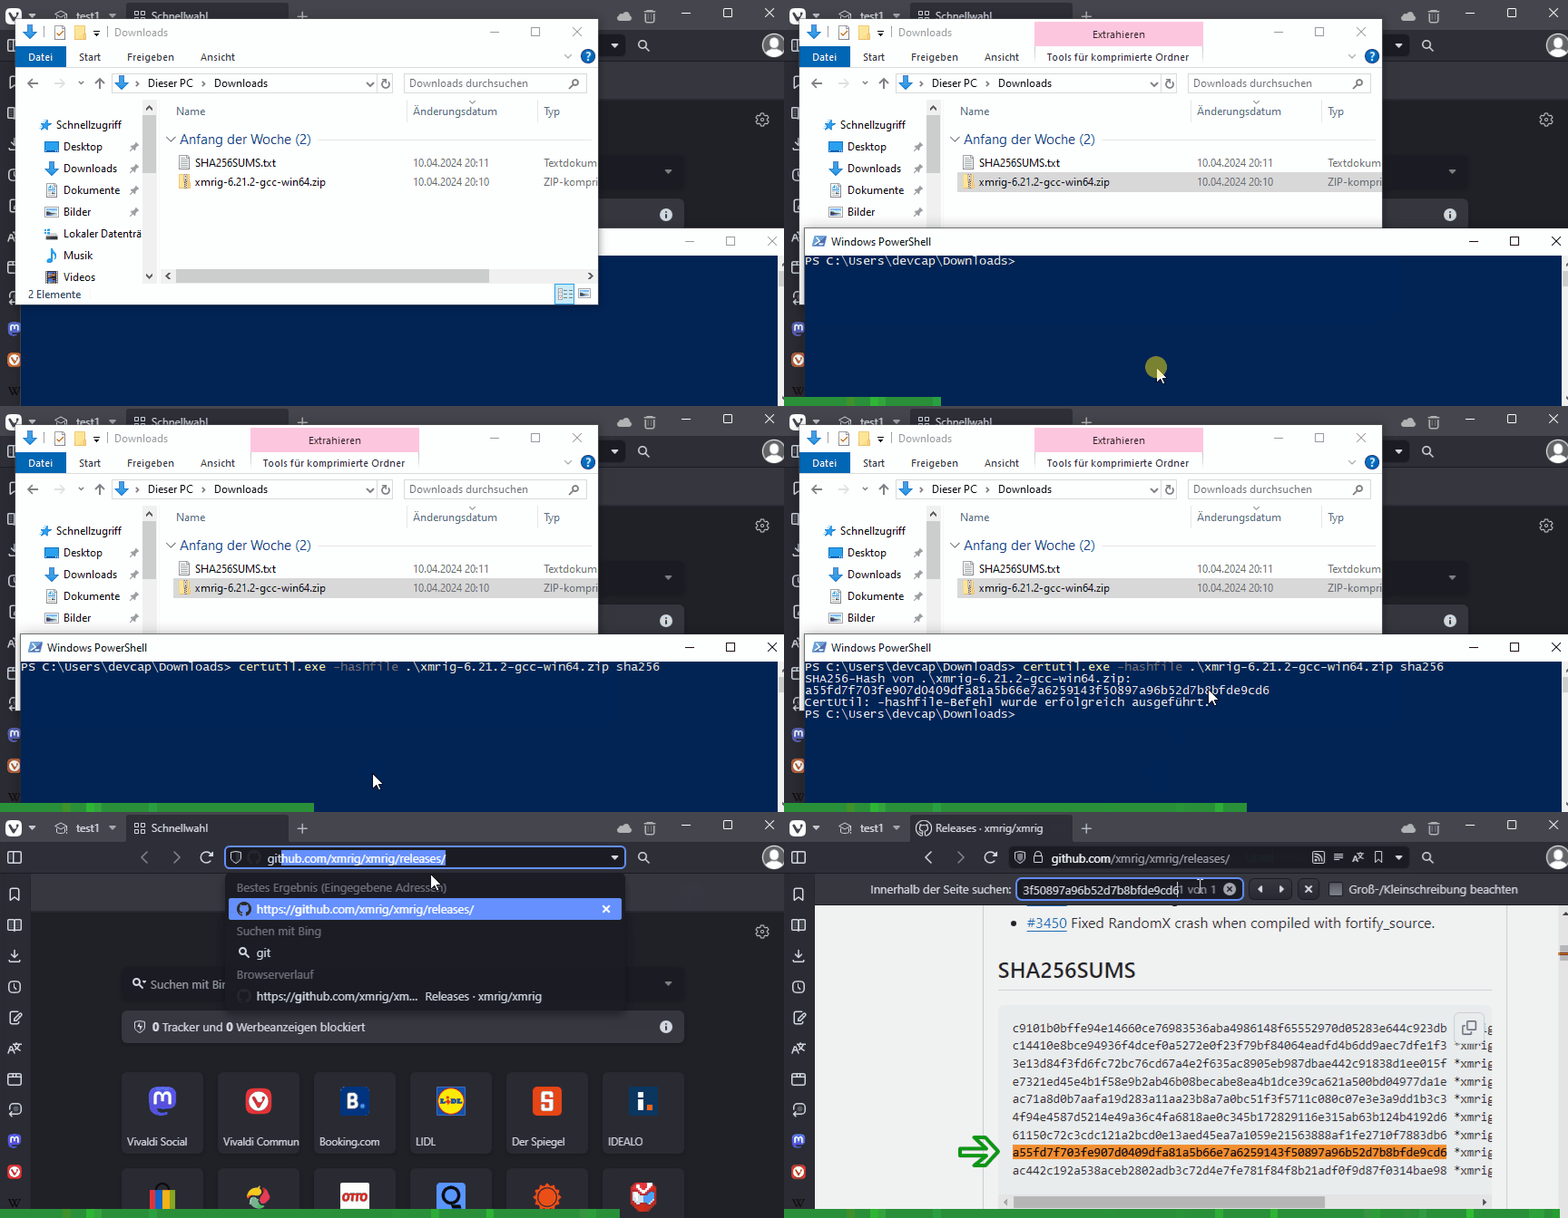
Wenn nicht schon durchgeführt, ladet jetzt die Minig-Software xmrig/GitHub Releases in der aktuellsten Version herunter. Als nächstes muss die Zip-Datei vor dem entpacken auf Integrität geprüft werden. Mit dieser Prüfung wird sichergestellt, dass ihr sicher die Originaldatei und keine veränderte/bösartige Datei erhalten habt. Mehr Infos zum Thema Checksum-Prüfung findet ihr Checksum Prüfung
Führt jetzt die Checksum-Prüfung der heruntergeladenen Datei mit folgendem Befehl aus.
$ Certutil.exe -hashfile .\monero-gui-install-win-x64-v0.18.3.3.exe sha256
2. xmrig Archiv-Datei entpacken
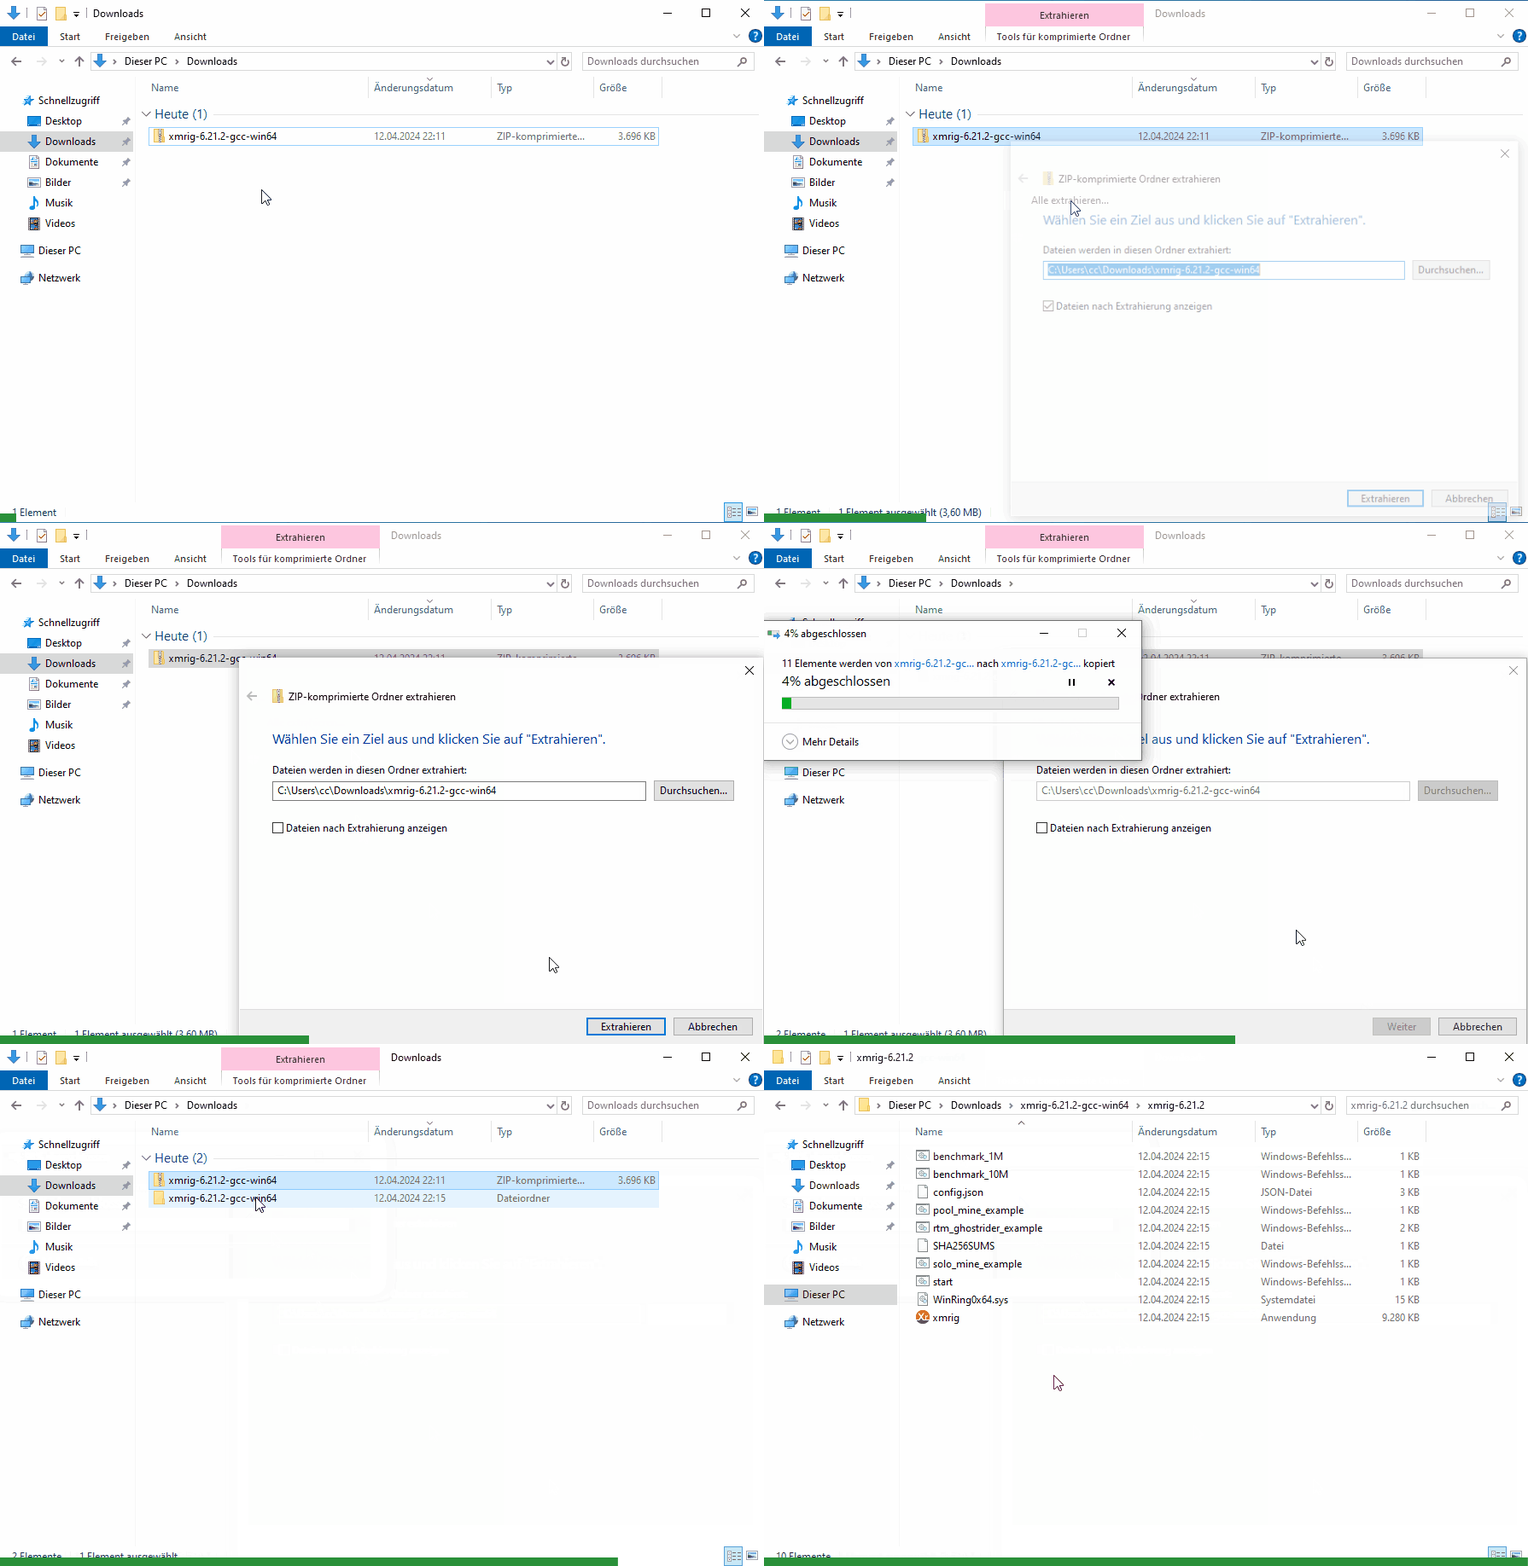
Sind die Checksummen identisch (Punkt 1), so kann die Datei jetzt entpackt werden. D.h. entpackt jetzt die Archivdatei.
3. xmrig Virus- & Bedrohungsschutz
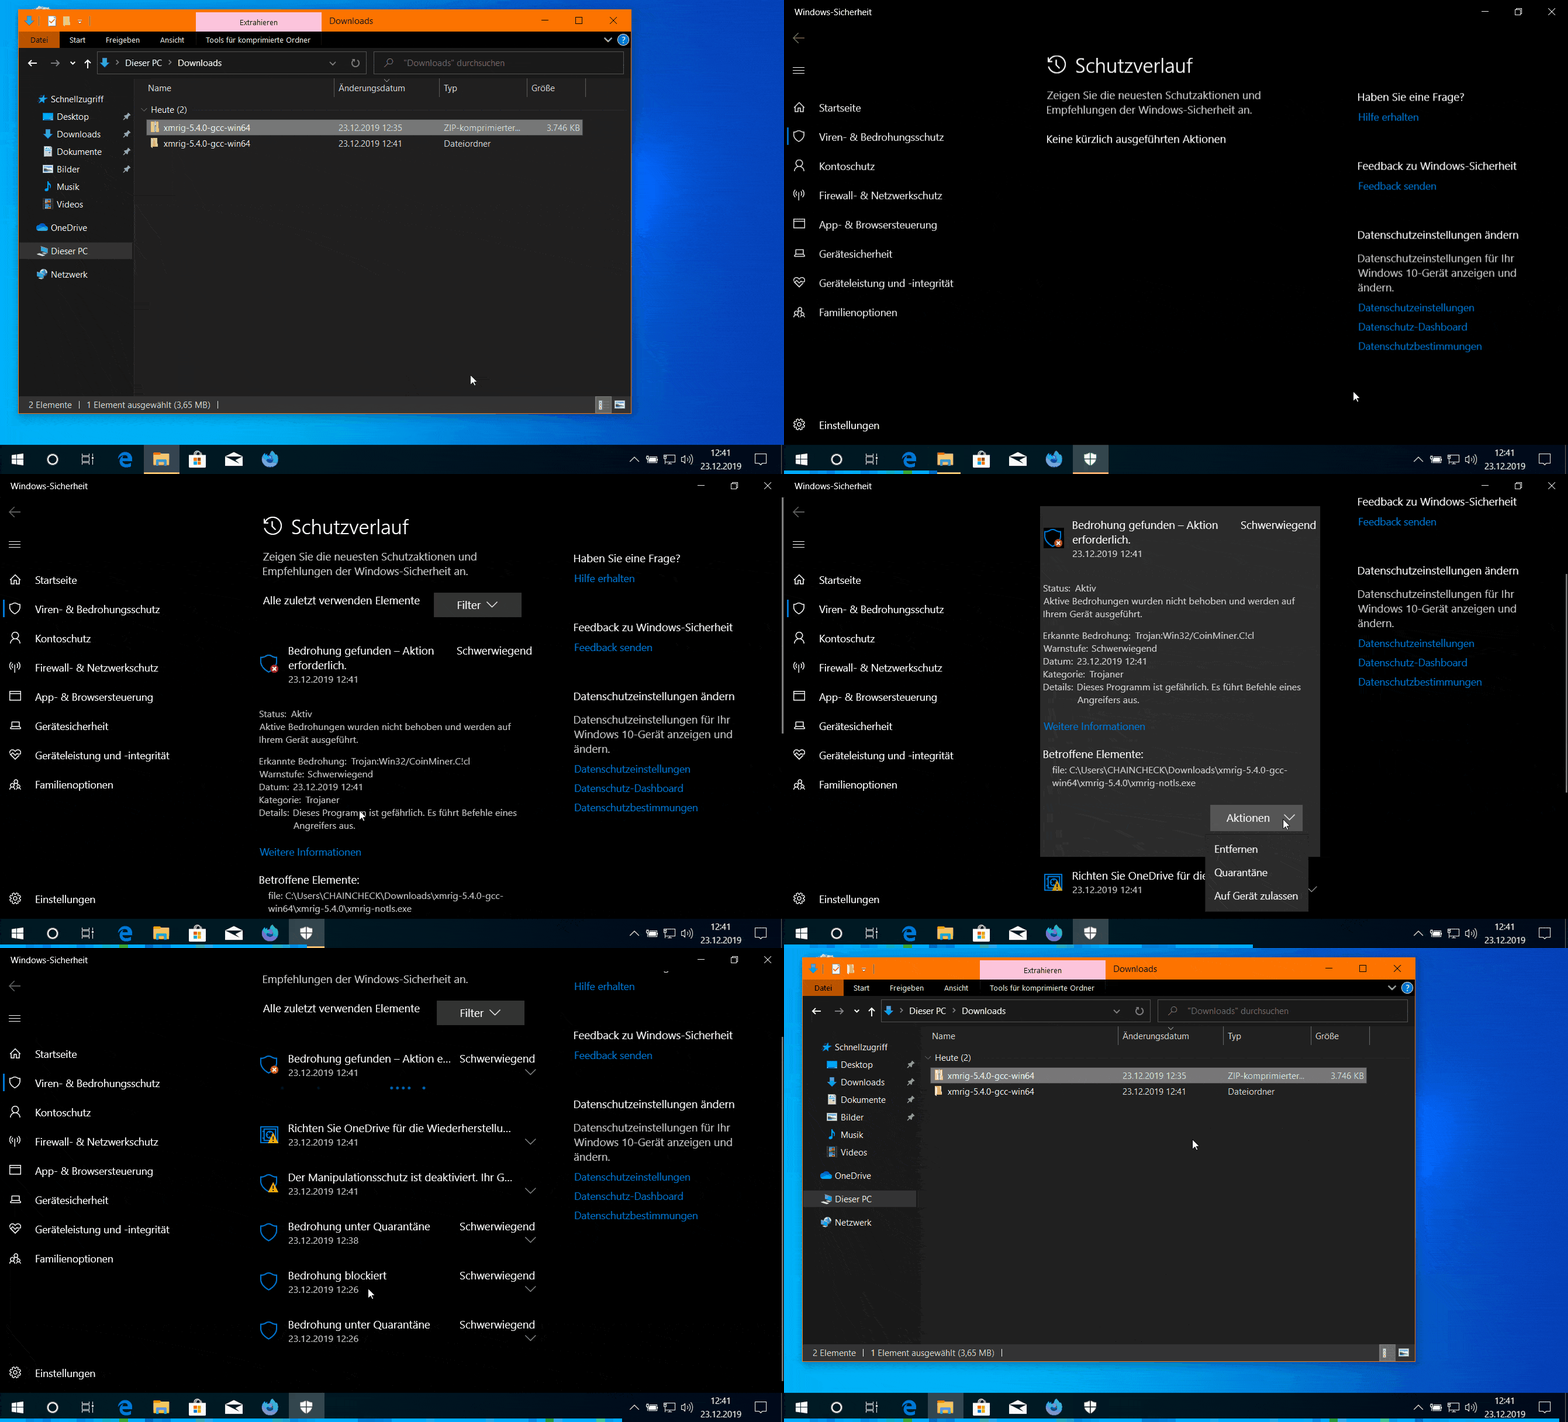
Es ist möglich, dass sich nach dem Entpacken der Windows Defender meldet. Folgende bzw. ähnliche Meldung könnte erscheinen.
"Windows Defender Antivirus hat Bedrohnung festgestellt. Weitere Details".
Diese Meldung tauchte 2019 auf. 2024 hat Windows Defender wohl dazugelernt und diese Meldung erscheint nicht mehr. Falls diese Meldung bei euch trotzdem erscheint, dann muss der Miner "xmrig" über den Defender zugelassen werden. Natürlich nur wenn eure Checksum-Prüfung (Punkt 1) die Datei-Integrität bestätigt hat.
Erscheint diese Meldung nicht, dann kann dieser Punkt übersprungen werden.
4. xmrig Konfigurations-Datei config.json öffnen und anpassen
Im Ordner xmrig-6.21.2 befindet sich die Datei "config.json". Öffnet jetzt diese Konfigurations-Datei mit einem Editor z.B. mit Notepad.
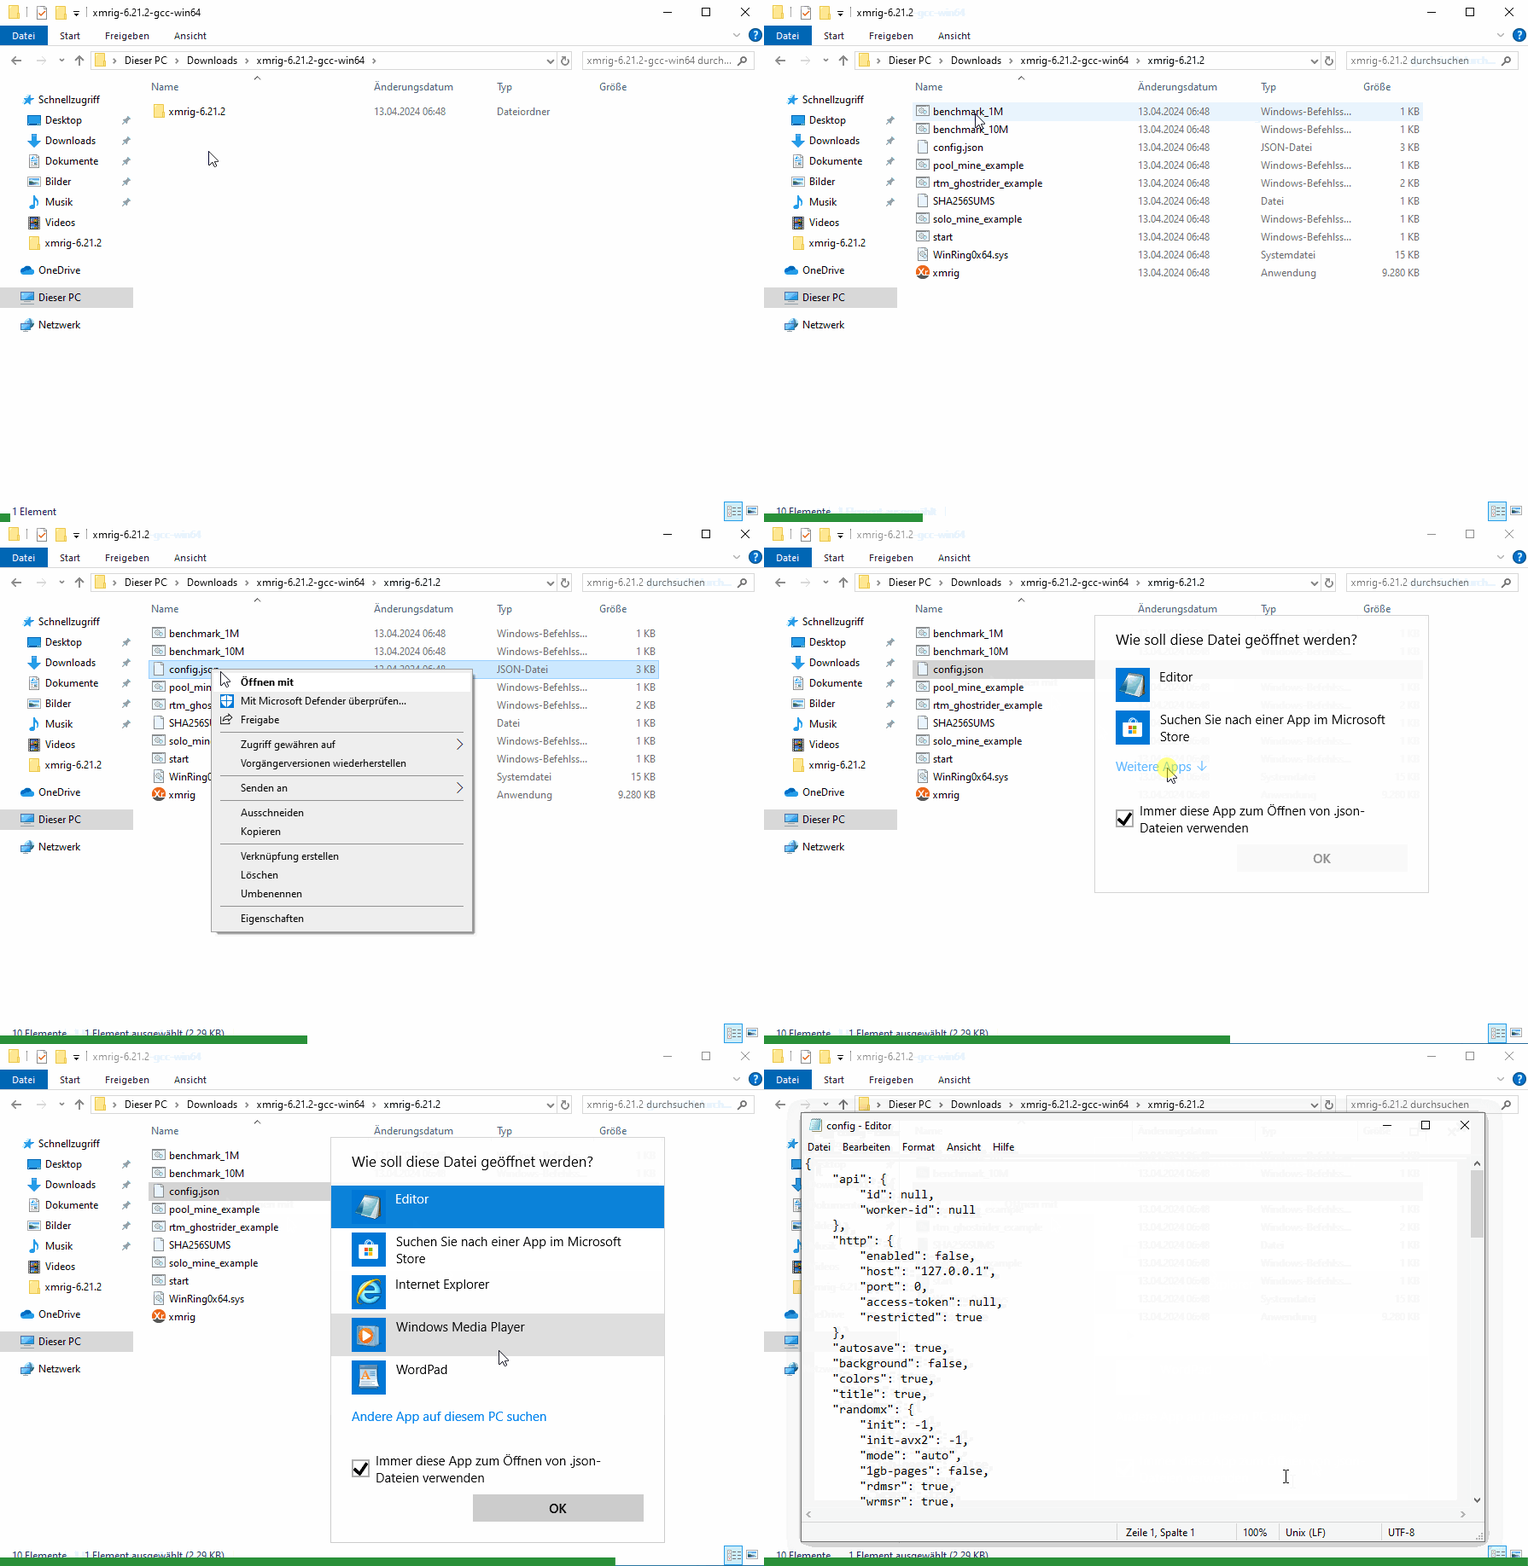
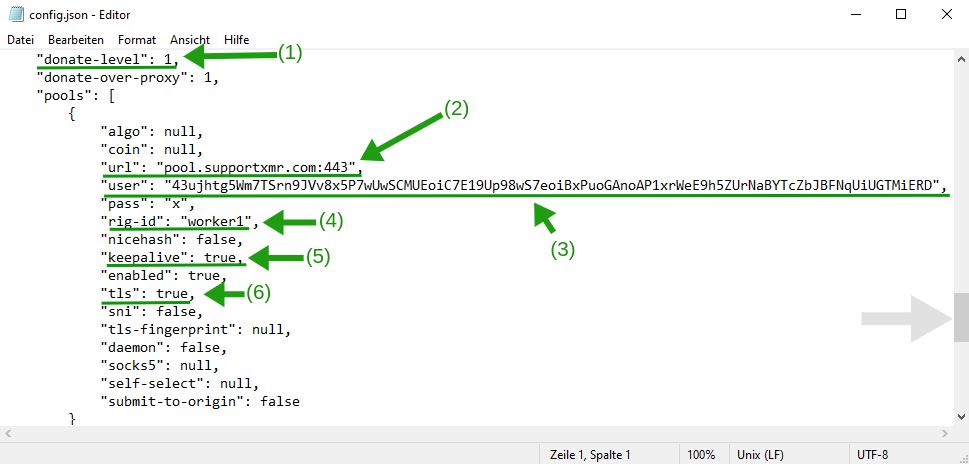
Anschließend muss die config.json-Datei in den Punkten 1-6 angepasst werden.
Diese Datei könnt ihr über Mining-Config-File vorkonfiguriert herunterladen. Dann müsst ihr nur noch die dort eingetragene Monero-Adresse gegen eure austauschen. Gerne könnt ihr aber auch für Testzwecke auf diese Adresse minen, wenn ihr mir was "spenden" möchtet ;)
Passt eure config.json-Datei jetzt wie folgt an.
- donate-level
Tragt hier 1-5 ein. Ihr entscheidet damit wieviel Prozent Hashpower ihr an den xmrig-Entwicker abgeben wollt. -
url
Tragt hier "pool.supportxmr.com:443" ein. Das ist die Mining-URL des Mining-Pools. -
user
Tragt hier eure Monero Adresse ein. An diese Adresse gehen die geschürften Monero-Coins. -
rig-id
Tragt hier "worker1" ein. -
keepalive
Tragt hier "true" ein. -
tls
Tragt hier "true" ein.
5. Monero-Mining starten
Im Grunde genommen war's das schon. Jetzt könnt ihr euren Monero Miner starten. Fürt dazu die Datei "xmrig.exe" per Doppelklick aus. Es öffnet sich der Monero-Miner in der Shell. Damit beginnt auch sofort das Mining.
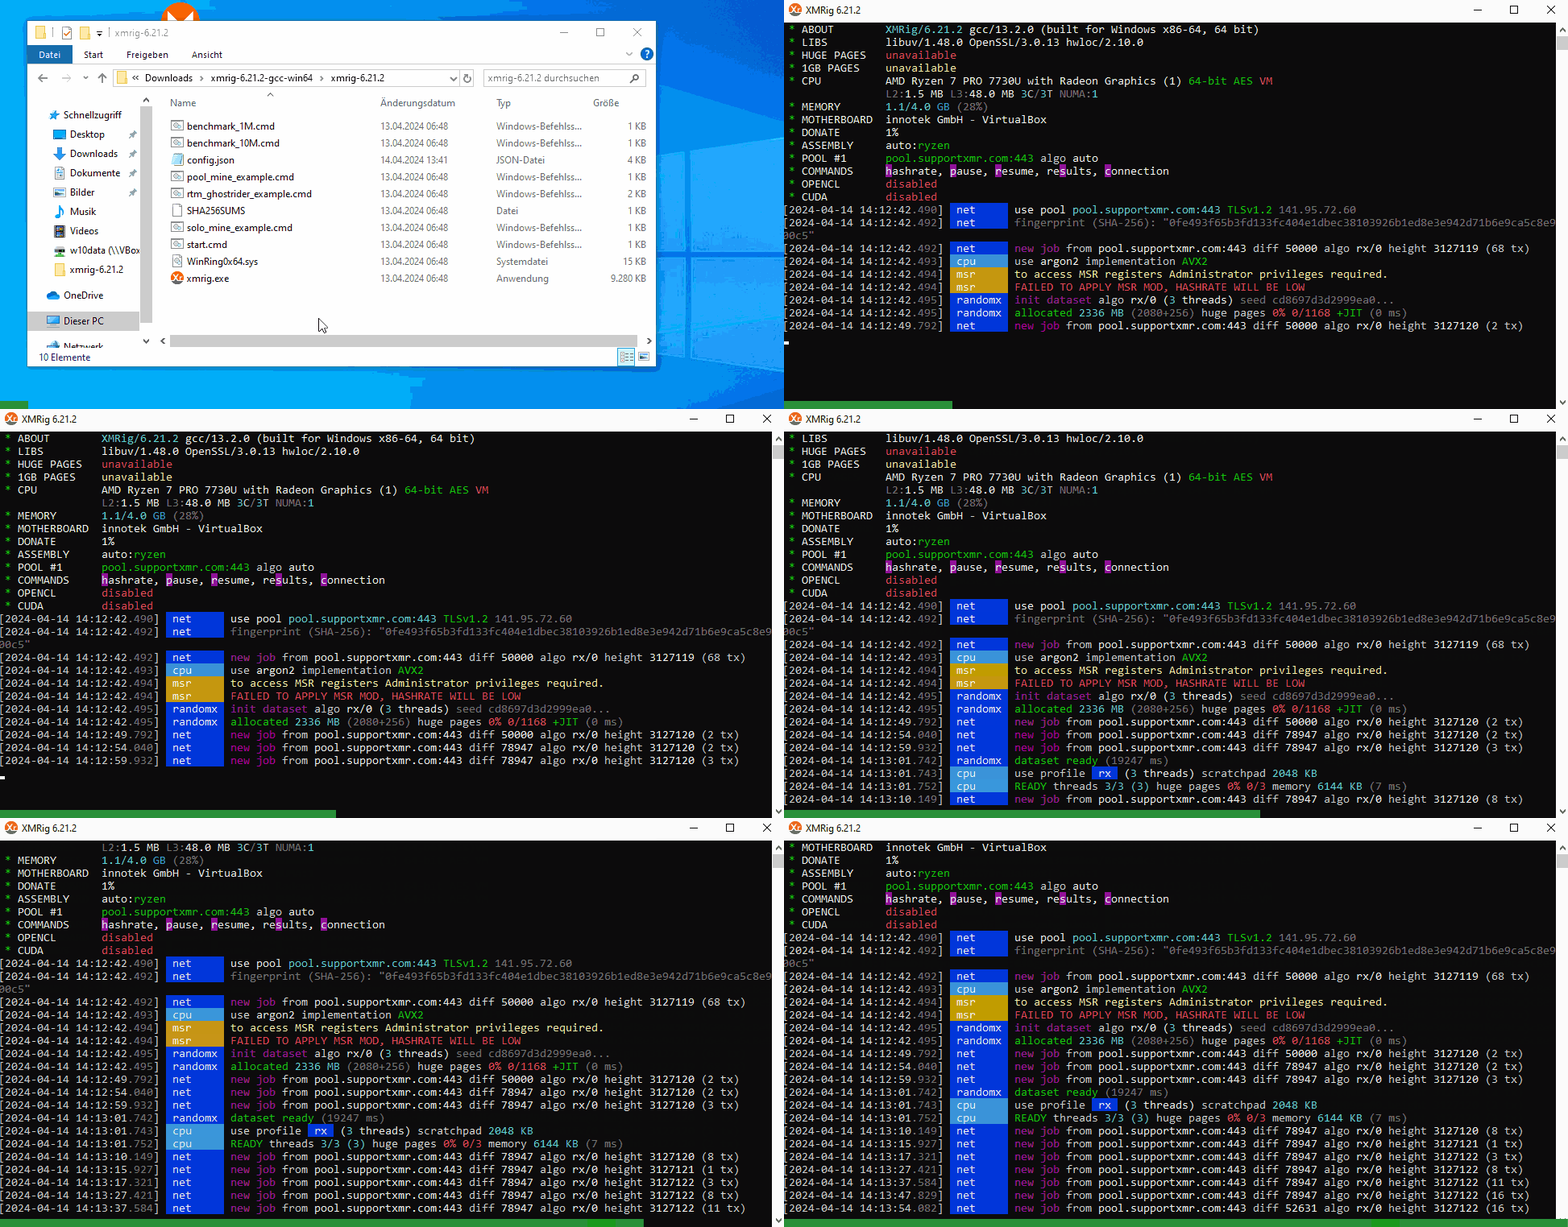
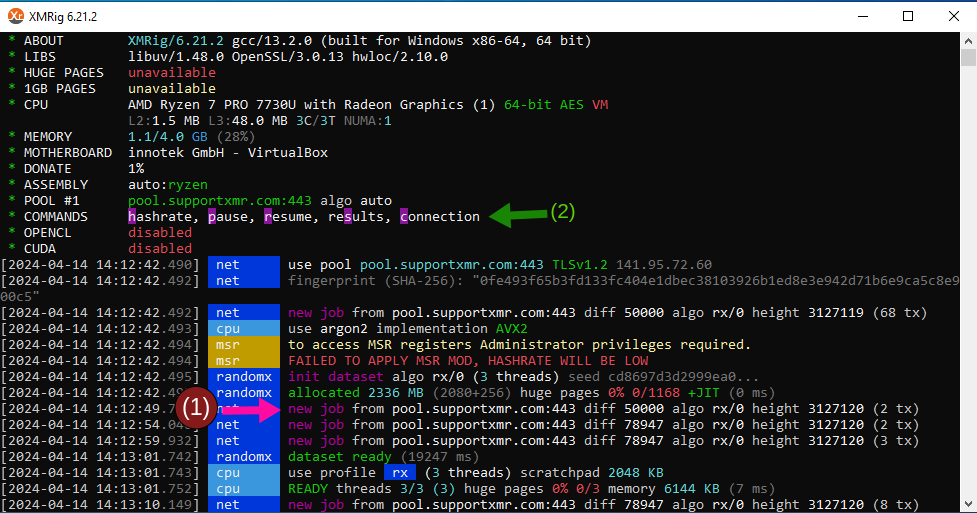
Nach ca. 1-2 Minuten sollte die Meldung (1) "new job" erscheinen. Das bedeutet, dass der Miner vom Mining-Pool erkannt und akzeptiert wurde und, dass der Miner jetzt Monero-Coins schürft.
Mit Punkt (2) könnt ihr über bestimmte Tasten weitere Optionen anzeigen lassen. Mit der Taste h wird die Hashrate angezeigt. Mit p könnt ihr euren Miner pausieren lassen. Mit r wird das Mining fortgesetzt und mit c könnt ihr prüfen, wieviele Verbindungen aufgebaut sind.
Zum Beenden des Miners einfach [STRG] + [c] drücken. Danach kann das Fenster geschlossen werden.
Beachtet, dass die Hashrate nie stabil ist. Sie schwankt relativ stark. Bei einem i7 (7500U) schwankt die Hashrate zwischen 600-800 H/s. Bei einem i7 (7600) schwankt die Hashrate zwischen 900-1300H/s usw.
6. Mining-Ertrag prüfen und Auszahlungsgrenze konfigurieren
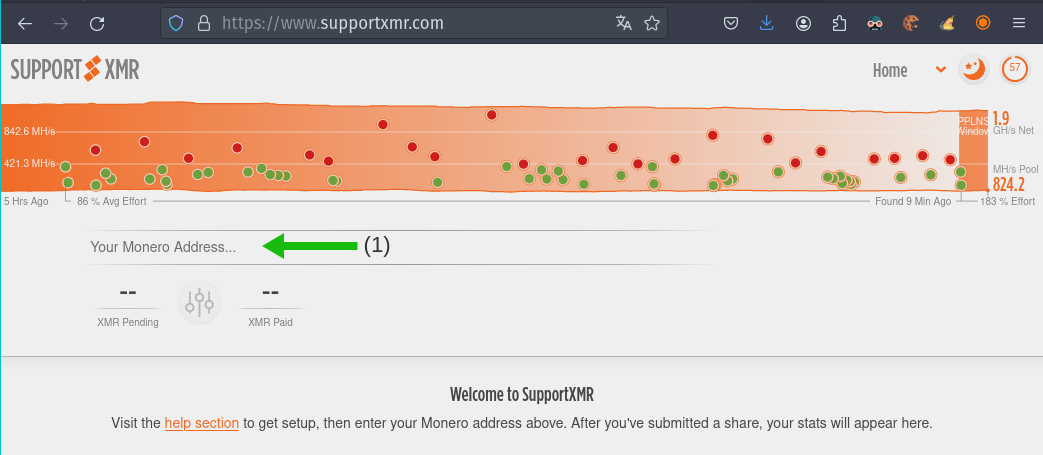
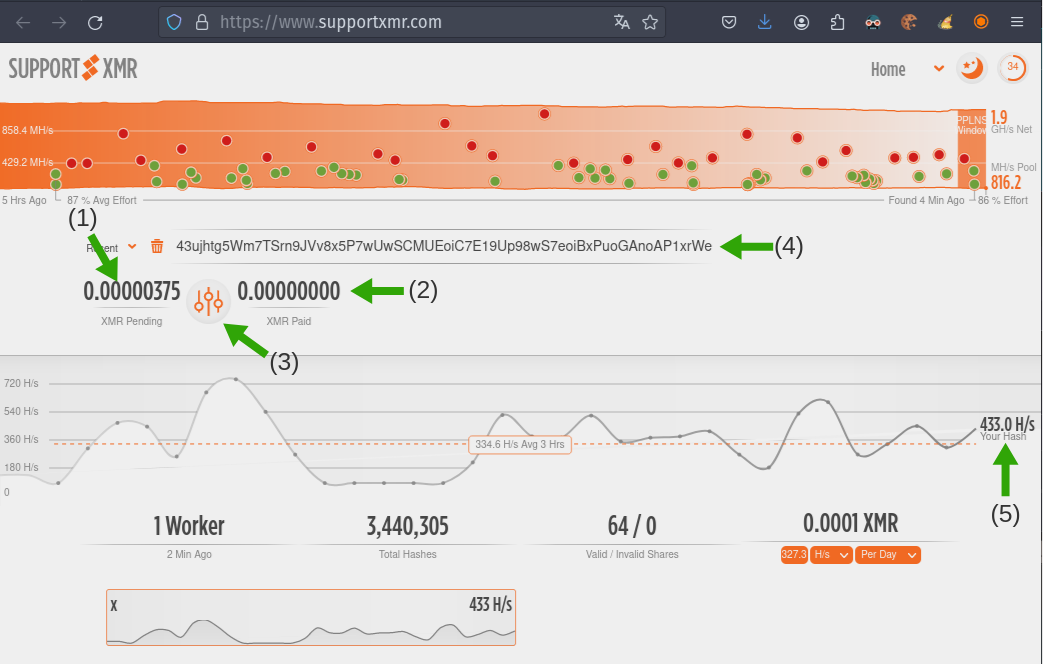
Die Ertragsprüfung der bisher erwirtschafteten Coins wird über den Mining-Pool durchgeführt. Geht dazu auf den Mining-Pool SupportXMR und tragt dort eure Monero Wallet/Einzahlungsadresse ein (1) und drückt Enter.
Sollte hier die Meldung "Address Not Found" erscheinen, dann seid ihr zu schnell, bzw. dann ist die Adresse im Monero Netzwerk noch nicht bekannt. Das kann passieren, wenn man die Monero-Wallet kurz vorher erst erstellt hat. Wartet in diesem Fall einfach ca. 10-20 Minunten bzw. bis eure Wallet den Status "Wallet ist synchronisiert" hat und dann tragt eure Adresse erneut unter (1) ein.
Nach maximal 2 Stunden sollte die Ansicht auf SupportXMR wie folgt aussehen. (1) Bereits geminte Moneros. (2) Bisher auf eure Adresse ausgezahlte Moneros. (3) Konfiguration der Auszahlungsgrenze. (4) Eure Wallet-Adresse. (5) Eure aktuelle Hashrate.
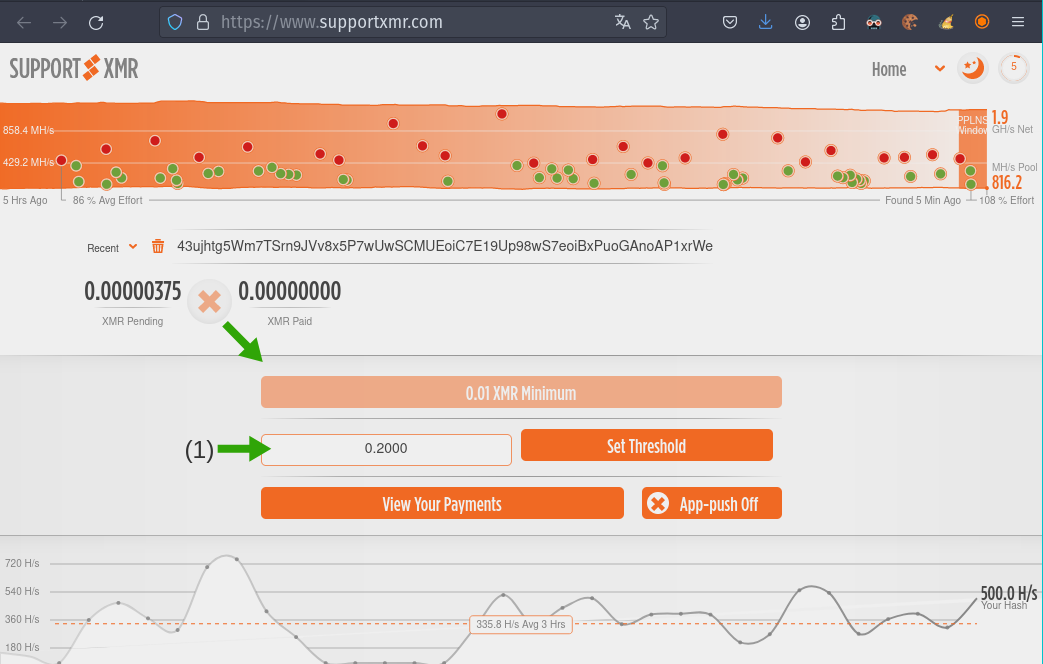
Um die Auszahlungsgrenze zu ändern, einfach auf die Konfiguration klicken und die gewünschte Menge eintragen (1) und mit dem Button "Set Threshold" bestätigen.
Geschafft! Ihr minted jetzt Moneros per CPU über den Mining-Pool SupportXMR. Sobald die oben definierte Auszahlungsgrenze erreicht ist, erhaltet ihr eure Moneros automatisch auf eure Monero-Adresse ausgezahlt.