Remote Verbindung zum SSH Server
Windows zu Linux
In diesem Artikel zeige ich wie man einen SSH Server unter Linux (Lubuntu/Ubuntu) installiert und sich so via SSH-Verbindung auf diesem Server mit Windows-Powershell, Linux-Terminal oder PuTTY-Client verbindet. Damit wird Remotedesktop oder Remmina (Linux) nicht mehr benötigt, da man dann alle Befehle auf dem Server über diese Verbindung ausführen kann.
Was benötigt wird:
- Ein Linux System z.B. innerhalb VirtualBox: Lubuntu 18 oder Lubuntu 19
- System Update durchführen: Lubuntu/Ubuntu Pakete aktualisieren (update/upgrade)
- Windows 10 oder 11 oder PuTTY (Download PuTTY)
Was bedeutet SSH?
SSH ist die Abkürzung für Secure Shell und bietet eine einfache Möglichkeit, sich über eine sichere Verbindung auf ein anderes Betriebssystem zu verbinden und dort Befehle remote auszuführen. Durch SSH wird eine Remote-Desktopverbindung zum anderen System nicht mehr benötigt, da alle Befehle über die SSH-Verbindung ausgeführt werden können.
Gibt es Nachteile?
Grafische (GUI) Texteditoren wie leafpad, featherpad oder gedit können mit einer SSH-Verbindung (Shell) nicht genutzt werden. Als Lösung können an dieser Stelle nicht-GUI Editoren wie z.B. vim oder nano verwendet werden. Die Verwendung ist jedoch etwas gewöhnungsbedürftig. Ich bevorzuge nano da die Steuerung bei nano über die [STRG]-Taste relativ einfach ist.
Los geht's - SSH Server installieren + aktivieren
Bevor die Installation des SSH Servers erfolgen kann, sollte das System vorher aktualisiert werden. Führt entsprechend jetzt ein update und upgrade auf dem Linux System aus. Falls nicht bekannt wie, schaut euch dazu bitte diese Anleitung an: Lubuntu/Ubuntu Pakete aktualisieren (update/upgrade)
Als nächstes muss der SSH Server auf der Linux Maschine (Gast-System) installiert und aktiviert werden. Öffnet dazu das Terminal auf dem Gast-System über das Menü oder die Tastenkombination [Strg] + [Alt] + [T] (Ubuntu/Lubuntu) und führt dort diesen Befehl aus um den SSH-Server zu installieren.
$ sudo apt-get install openssh-server
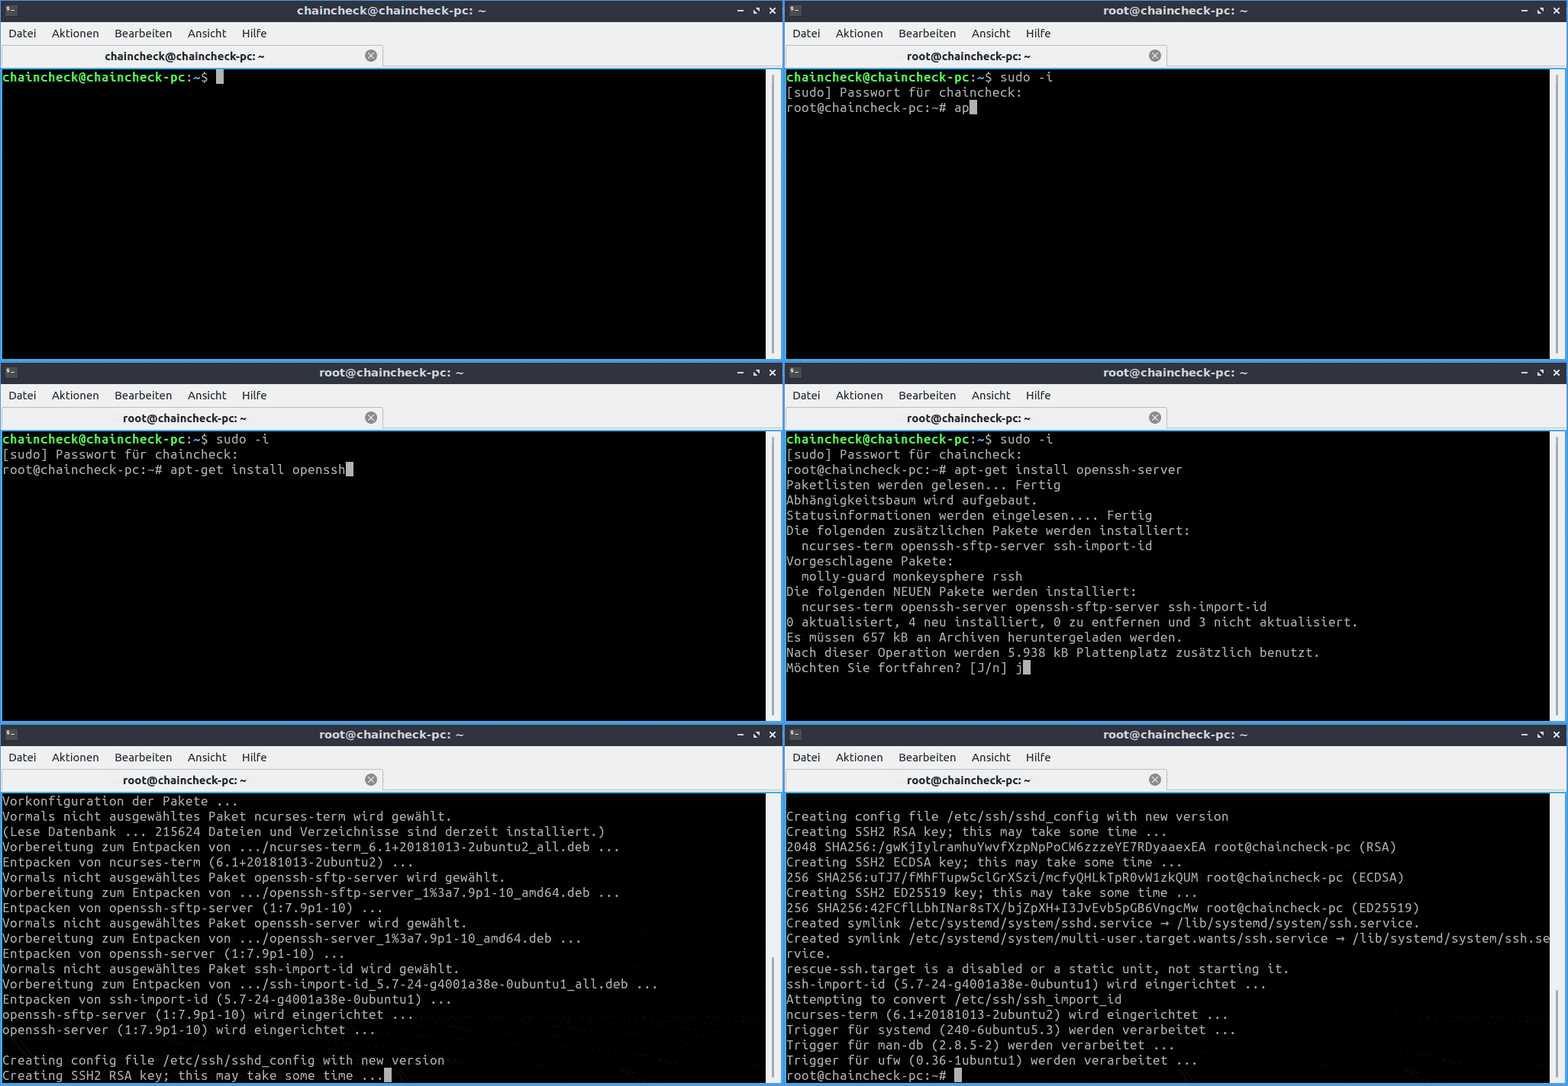
Mit folgender Eingabe kann geprüft werden, ob der SSH-Server erfolgreich installiert und aktiviert ist.
$ systemclt status ssh
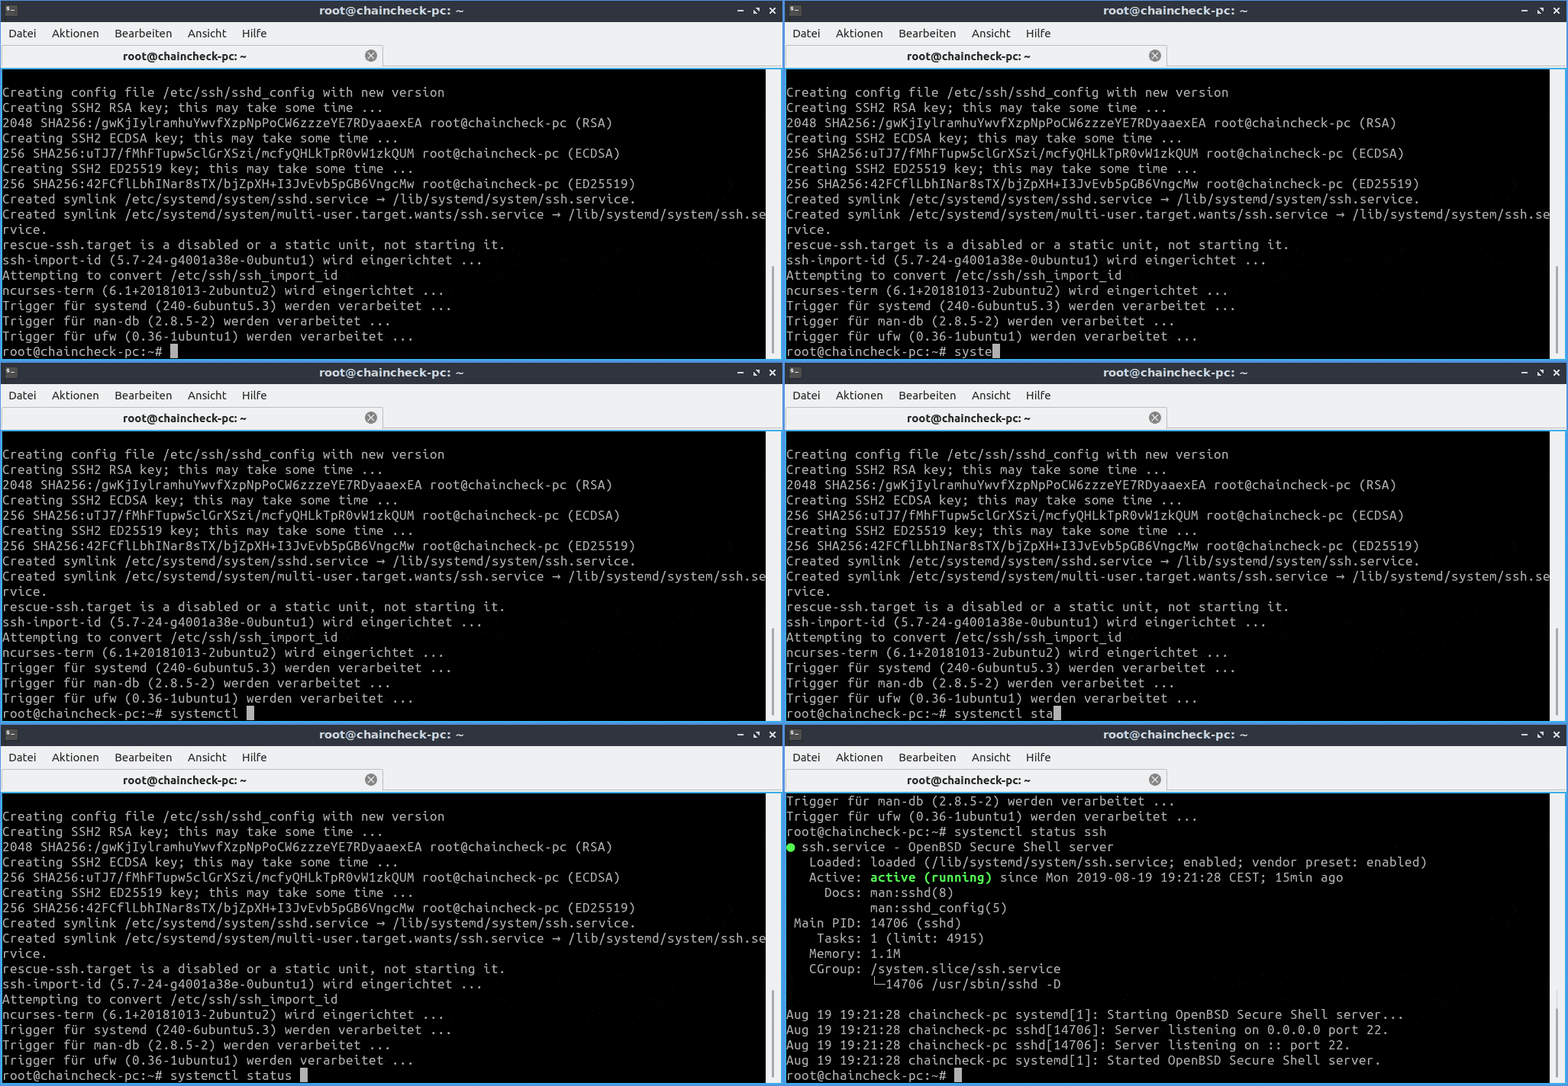
Wenn bei euch unter Active: "active (running) steht, dann war die Installation und Aktivierung erfolgreich.
Jetzt ist die Verbindung zum Rechner per SSH-Verbindung möglich. Diese SSH-Verbindung kann jetzt über diese zwei Möglichkeiten erfolgen:
Möglichkeit 1:
Verbindung zum SSH-Server via Windows 10 oder 11
Ab Windows Version 10 ist es möglich eine SSH-Verbindung ohne externe Software herzustellen.
Dazu muss als erstes unter Windows die Powershell geöffnet werden. Dazu drückt ihr die Tastenkombination [Windows] + [R], und gibt "powershell" ein. Es öffnet sich die Windows PowerShell. Zum herstellen einer SSH-Verbindung muss folgende Syntax verwendet werden.
ssh <benutzer>@<computername>
In diesem Beispiel heißt der Benutzer chaincheck und der Computername chaincheck-pc. Dementsprechend muss für die Verbindugnsherstellung in der Powershell folgender Befehl eingegeben werden.
$ ssh chaincheck@chaincheck-pc
Sollte der PC-Name (Hostname) nicht aufgelöst werden, dann könnt ihr auch die IP-Adresse des Systems eingeben.
$ ssh chaincheck@192.168.0.222
Bei der Erstverbindung müsst ihr die Verbindung mit yes bestätigen. Danach müsst ihr noch das Passwort des Zielsystems eingeben.
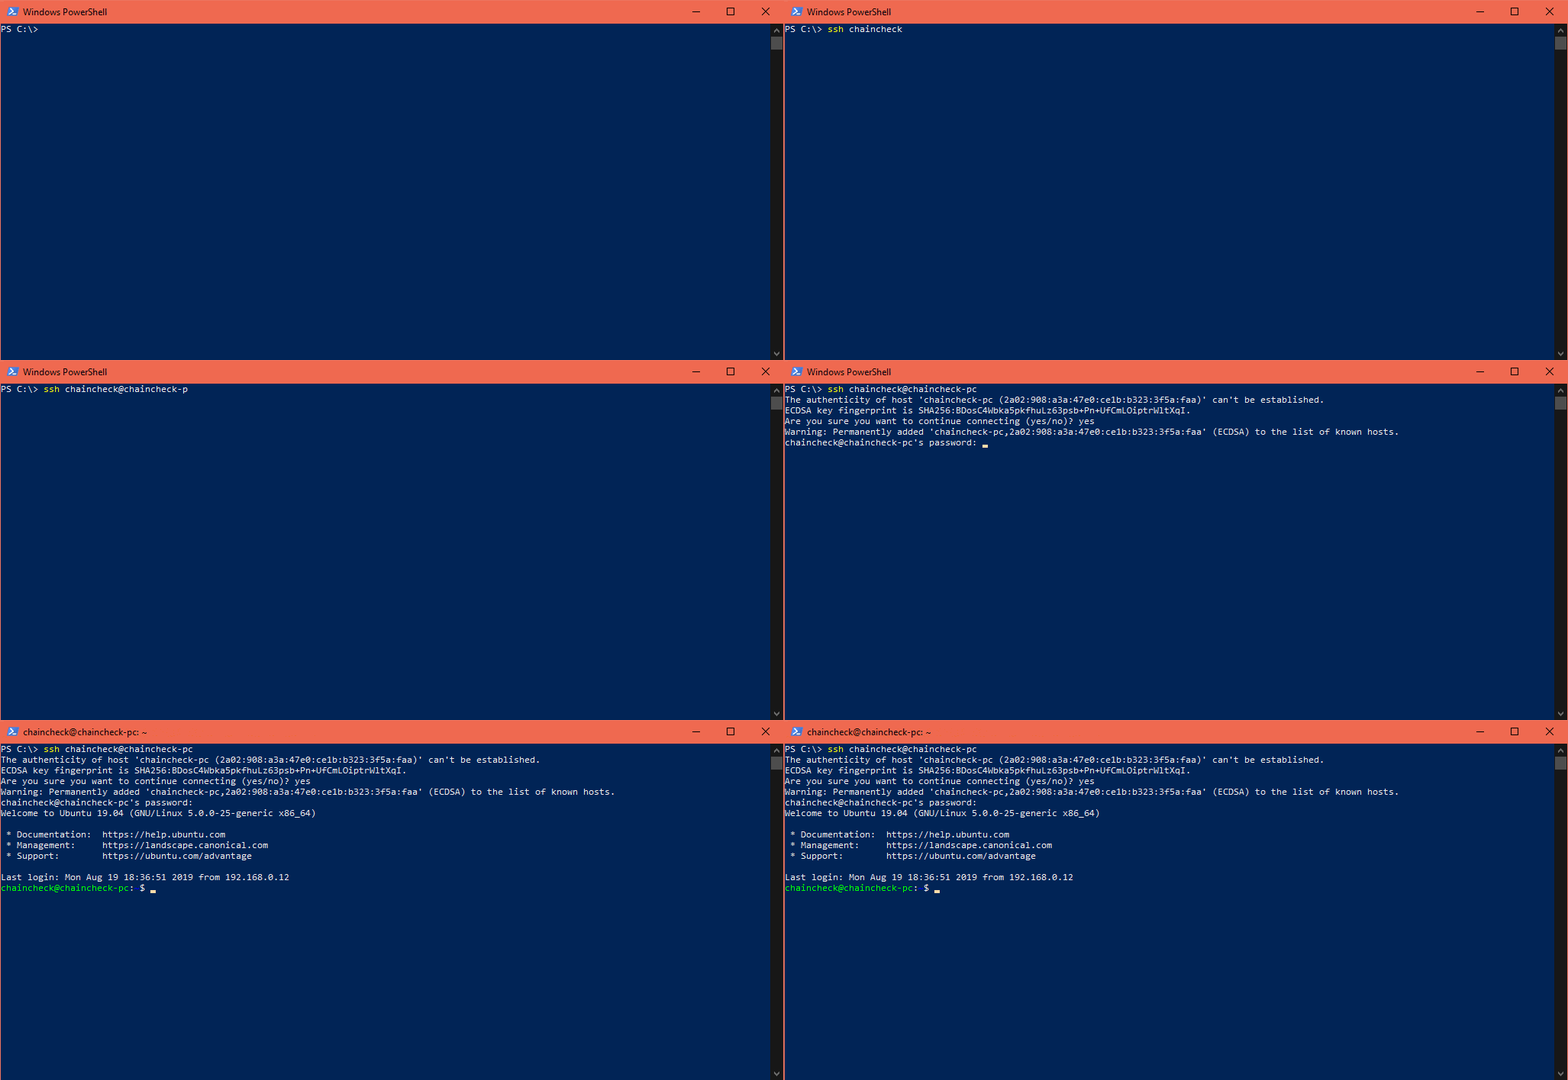
Geschafft, ihr seid jetzt auf dem Zielsystem per SSH verbunden und könnt jetzt Befehle über die PowerShell auf dem anderen Rechner ausführen.
Sollte die Verbindung nicht funktionieren, dann kann ein Neustart des Zielsystems (Gast-System) helfen. Oder ihr starten den ssh-Dienst mit folgendem Befehl neu:
$ systemctl restart ssh
Möglichkeit 2:
Verbindung zum SSH-Server via PuTTY
Mit älteren Windows Versionen (z.B. Windows Version älter Oktober 2018) funktioniert die SSH-Verbindung mit der PowerShell nicht. Hier gibt es aber eine Lösung - PuTTY.
Im PuTTY muss unter Session im Feld "Host Name (or IP adress)" der PC Namen oder die IP-Adresse des PCs eingegeben werden:
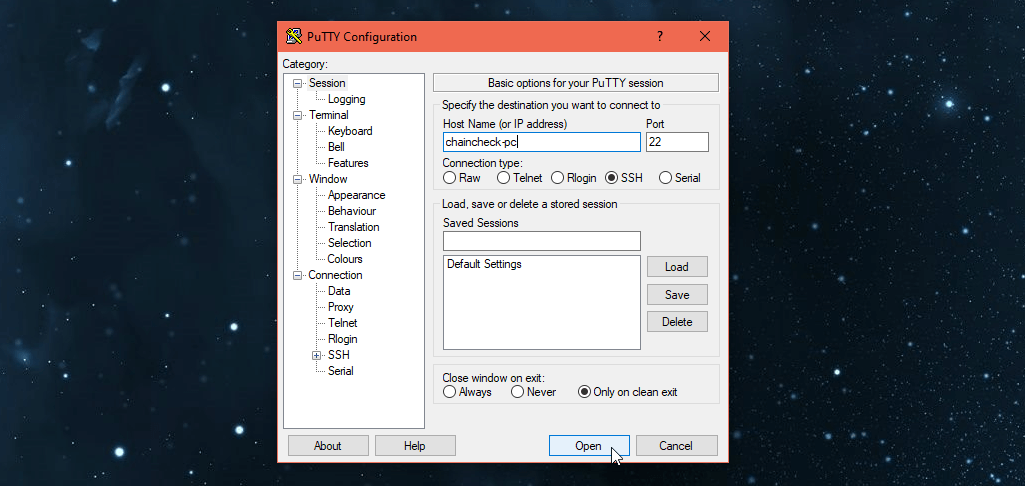
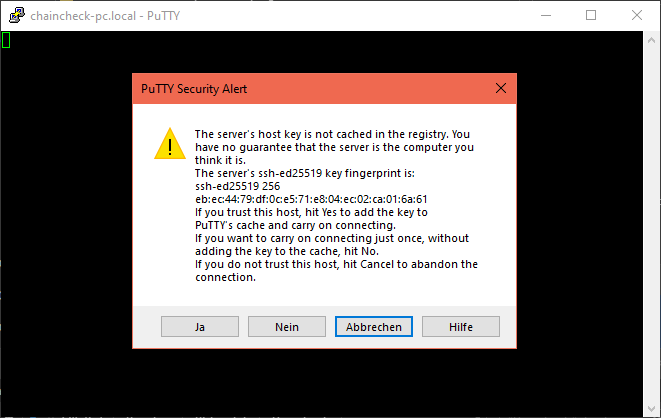
Bei der Erst-Verbindung erscheint die folgende Abfrage, welche mit "Ja" zu bestätigen ist:
Es öffnet sich das Anmeldefenster. Hier muss nur noch der Benutzername und das Kennwort eingegeben werden.
Der Ablauf:
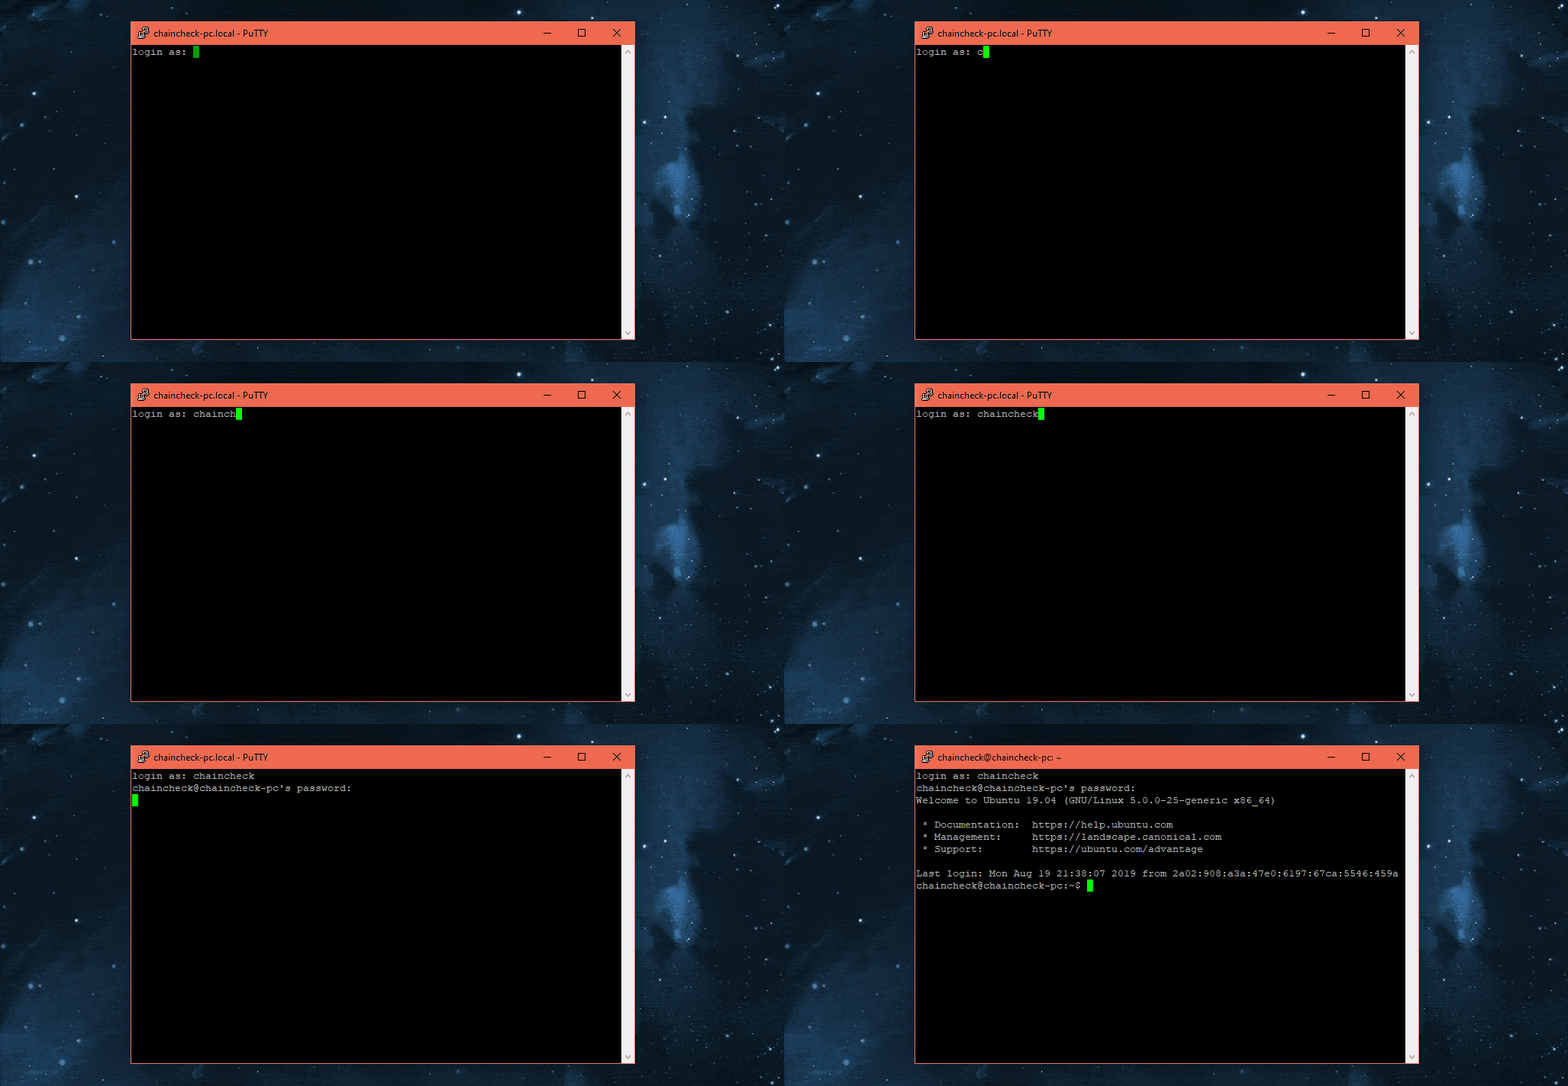
Das war's. Jetzt seid ihr via PuTTY und SSH auf dem Rechner verbunden und könnt alle Befehle über diese Verbindung ausführen ohne sich per Remote-Desktop auf diesen Rechner verbinden zu müssen.
Tipp
Copy&Past in der Eingabeaufforderung / Powershell / cmd
In einigen Fällen muss ein sicheres und dementsprechend langes und komplexes Kennwort verwendet werden. Das ist z.B. der Fall, wenn ihr euch auf ein VPS aufschlatet. Dies komplexe Kennwort manuell einzutibben, ist dann sehr mühsam. Bequemer und schnelle ist es, wenn man Copy&Paste nutzt. Und genau das ist auch möglich. Copy&Paste funktioniert in der Powershell und der Eingebeaufforderung/cmd wie folgt:
Wenn der gewünschte Wert in der Zwischenablage ist, dann einfach auf den Cursor mit der rechten Maustate ein Mal klicken und schon wird der Wert aus der Zwischenablage eingefügt.